HTTP Client HTTP 客户端
最后修改日期:2024 年 8 月 30 日
With the HTTP Client plugin, you can create, edit, and execute HTTP requests directly in the IntelliJ IDEA code editor.
使用HTTP 客户端插件,您可以在 IntelliJ IDEA代码编辑器中直接创建、编辑和执行 HTTP 请求。

There are two main use cases when you need to compose and run HTTP requests:
当你需要组合和运行 HTTP 请求时,有两个主要的使用场景:
When you are developing a RESTful web service and want to make sure it works as expected, is accessible in compliance with the specification, and responds correctly.
当您正在开发一个 RESTful 网络服务,并且希望确保其按照预期工作,符合规范并正确地响应时。When you are developing an application that addresses a RESTful web service. In this case, it is helpful to investigate the access to the service and the required input data before you start the development. During development, you may also call this web service from outside your application. This may help locate errors when your application results in unexpected output while no logical errors are detected in your code, and you suspect that the bottleneck is the interaction with the web service.
当您开发一个处理 RESTful web 服务的应用程序时,调查服务的访问和所需的输入数据在开始开发之前非常有帮助。在开发过程中,您还可以从应用程序外部调用此 web 服务。当您的应用程序产生意外输出而且代码中没有检测到逻辑错误时,怀疑瓶颈是与 web 服务的交互时,这可能有助于定位错误。
HTTP requests are stored in .http and .rest files and are marked with the icon.
HTTP 请求存储在 .http 和 .rest 文件中,并且使用 图标标记。
Support for HTTP files includes the following features:
支持 HTTP 文件的功能包括以下特点:
Code completion for hosts, method types, header fields, and endpoints defined via OpenAPI
hosts,方法类型,头字段和通过 OpenAPI 定义的端点的代码完成Code folding for requests, their parts, and response handler scripts
<一个 id=0>请求的代码折叠,他们的部分,和响应处理脚本Reformat requests according to your HTTP Request code style.
根据您的HTTP 请求代码风格重新格式化请求。Inline documentation for request header fields and doc tags
请求头字段和文档标签的内联文档Viewing the structure of HTTP request files
查看 HTTP 请求文件的结构Language injections in Web languages inside the request message body
在请求消息体中的 Web 语言中执行语言注入
If necessary, before you begin, configure the Proxy settings on the HTTP Proxy page of the Settings dialog (⌘Сmd0,) .
如果需要,在开始之前,请在“设置”对话框( ⌘Сmd 0, )的HTTP 代理页面上配置代理设置。
You can work with HTTP requests either from scratch files or from physical files of the HTTP Request type. Each file can contain multiple requests, and you can create as many files as needed.
您可以从头文件还是物理文件中使用 HTTP 请求。每个文件可以包含多个请求,并且您可以根据需要创建多个文件。
Scratch files can be used to test HTTP requests during development. Scratch files are not stored inside a project, so IntelliJ IDEA can modify them and add additional information about the request. When an HTTP request is executed from a scratch file, the link to the response output file is added below the request and at the top of the requests history file.
Scratch 文件 可以用于在开发过程中测试 HTTP 请求。Scratch 文件不存储在项目内,因此 IntelliJ IDEA 可以对它们进行修改并添加关于请求的其他信息。当从 Scratch 文件执行 HTTP 请求时,响应输出文件的链接会添加在请求下方和请求历史文件的顶部。
Press ⌘Сmd⇧Shift0N and select HTTP Request.
按下 ⌘Сmd ⇧Shift 0N 并选择 HTTP 请求。
Physical files can be used for documenting, testing, and validating HTTP requests. Physical files are stored inside your project, and IntelliJ IDEA will not modify them. When an HTTP request is executed from a physical file, this file is not modified. Information about the executed request with the link to the response output file is added to the top of the requests history file.
物理文件可以用于记录、测试和验证 HTTP 请求。物理文件存储在你的项目内,IntelliJ IDEA 不会修改它们。当从物理文件执行 HTTP 请求时,该文件不会被修改。关于执行的请求和响应输出文件的链接将被添加到请求历史文件的顶部。
In the File menu, point to New, and then click HTTP Request.
在 文件 菜单中,指向 新建,然后点击 HTTP 请求。
You can use the Move refactoring F6 to move HTTP requests from scratches to physical files, as well as between physical files.
您可以使用Move重构 F6 将 HTTP 请求从头开始移动到物理文件,以及在物理文件之间移动。
In the editor, place the caret at the request to be moved and do one of the following:
在编辑器中,将光标放置在要移动的请求处,并执行以下操作之一:From the main menu or the context menu, select Refactor | Move.
从主菜单或上下文菜单中选择重构 | 移动。Press ⌥ Option↩Enter and select the Move HTTP Requests intention action.
按下 ⌥ Option ↩Enter 并选择移动 HTTP 请求意图动作。Press F6.
按下 F6 。
In the Move HTTP Requests dialog that opens, do the following:
在打开的移动 HTTP 请求对话框中,执行以下操作:In the Path field, choose one of the existing .http files from the list or click
to locate the file.
在路径字段中,从列表中选择一个现有的.http文件,或点击查找文件。
You can also type the full path to the file manually. If you specify the name of a non-existing file, a new file with the provided name will be created automatically.
您还可以手动键入文件的完整路径。如果您指定了一个不存在的文件名,系统将自动创建一个具有指定名称的新文件。In the Requests list, select the checkboxes next to the requests you want to move.
在请求列表中,选择要移动的请求旁边的复选框。
IntelliJ IDEA uses the HTTP request in Editor format, which provides a simple way to create, execute, and store information about HTTP requests. You can type them directly in the created HTTP request files using the following general syntax:
IntelliJ IDEA 使用Editor 中的 HTTP 请求格式,提供了一种简单的方法来创建、执行和存储有关 HTTP 请求的信息。您可以在创建的 HTTP 请求文件中直接键入它们,使用以下通用语法:
###
Method Request-URI HTTP-Version
Header-field: Header-value
Request-Body
After the ###
separator, you can enter any comments preceded by #
or //
.
在###
分隔符之后,您可以输入以#
或//
开头的任何注释。
tip 小费
To quickly find your request in run/debug configurations, Search Everywhere, and Run Anything, you can give it a name.
为了快速在运行/调试配置中找到您的请求,Search Everywhere和Run Anything,您可以给它取一个名字。
note 笔记
You can use the Editor | Color Scheme | HTTP Request settings to customize colors and style for highlighting request syntax (name, comments, parameters, headers, and so on).
您可以使用Editor | Color Scheme | HTTP Request设置来自定义颜色和样式以突出显示请求的语法(名称、注释、参数、标头等)。
To speed up composing HTTP requests, you can:
要加快组合 HTTP 请求的速度,您可以:
Click Tools | HTTP Client | Create Request in HTTP Client. If a request file is opened in the editor, this will add a request template to the opened file. Otherwise, this will create a new .http scratch file.
点击 工具 | HTTP 客户端 | 在 HTTP 客户端中创建请求。如果编辑器中已打开一个请求文件,将在该文件中添加一个请求模板。否则,将创建一个新的 .http 临时文件。Click
on top of the request's editor panel. In the popup menu, select the type of the request to add.
在请求的编辑面板上点击。在弹出菜单中,选择要添加的请求类型。
Alternatively, use live templates. In the editor, you can press ⌘Сmd0J to view the list of available templates. For example, gtr expands to a simple GET request; mptr expands to a multipart/form-data
POST request.
或者,使用实时模板。在编辑器中,您可以按下 ⌘Сmd 0J 来查看可用模板列表。例如,gtr扩展为一个简单的 GET 请求;mptr扩展为一个multipart/form-data
POST 请求。

tip 提示
If you use
application/x-www-form-urlencoded
content type, you should use%
to escape%
,&
,=
, and+
special characters in the keys and values of the request body.
如果您使用application/x-www-form-urlencoded
内容类型,您应该使用%
对请求体的键和值中的特殊字符%
,&
,=
, 以及+
进行转义。For example, for a server to receive
field1=value%2Bvalue&field2=value%26value
(where%2B
corresponds to+
and%26
corresponds to&
), the request body should be as follows:
例如,对于服务器来接收field1=value%2Bvalue&field2=value%26value
(其中%2B
对应于+
,%26
对应于&
),请求体应如下:POST https://ijhttp-examples.jetbrains.com/post Content-Type: application/x-www-form-urlencoded field1=value%+value&field2=value%&value
Or you can write encoded values right away, for example
value1%ADvalue2
forvalue1 value2
orvalue1%2Bvalue2
forvalue1+value2
.
或者您可以直接编写编码值,例如value1%ADvalue2
是指value1 value2
或者value1%2Bvalue2
是指value1+value2
。
If a web service requires you to use custom HTTP methods, you can add such methods to IntelliJ IDEA and use them in your HTTP requests.
如果一个 Web 服务需要您使用自定义的 HTTP 方法,您可以将这些方法添加到 IntelliJ IDEA 中,并在您的 HTTP 请求中使用它们。
In an .http file, type a custom method in uppercase letters.
在一个 .http 文件中,以大写字母键入一个自定义方法。When this method is highlighted as unknown, press ⌥ Option↩Enter (Show Context Actions) and select Add custom HTTP method.
当这种方法被标记为未知时,按下 ⌥ Option ↩Enter (显示上下文操作)并选择 添加自定义 HTTP 方法。

IntelliJ IDEA will now recognize it as a valid HTTP method. You can find all custom HTTP methods (and add new ones) in the IDE settings (⌘Сmd0,), under Tools | HTTP Client | Custom HTTP methods.
IntelliJ IDEA 现在将其识别为有效的 HTTP 方法。您可以在 IDE 设置( ⌘Сmd 0, )中找到所有自定义 HTTP 方法(并添加新方法),位于工具 | HTTP 客户端 | 自定义 HTTP 方法下。
Starting with version 2024.1, IntelliJ IDEA provides support for HTTP/2 in HTTP requests. You can specify the HTTP version after the URL part, for example:
从版本 2024.1 开始,IntelliJ IDEA 在 HTTP 请求中提供对 HTTP/2 的支持。您可以在 URL 部分之后指定 HTTP 版本,例如:
GET https://example.org HTTP/2
If no version is specified, the HTTP Client attempts to use HTTP/2 for secure connections (and falls back to HTTP/1.1 if HTTP/2 negotiation fails) and HTTP/1.1 for non-secure connections.
如果没有指定版本,HTTP 客户端将尝试在安全连接上使用 HTTP/2(并在 HTTP/2 协商失败时回退到 HTTP/1.1),在非安全连接上使用 HTTP/1.1。
After the request URL, put a white space and press ⌃CtrlSpace or start typing
HTTP
.
在请求 URL 之后,放置一个空格并按下 ⌃Ctrl Space 或开始输入HTTP
。From the completion list, select one of the suggested values:
从完成列表中选择一个建议的值:HTTP/1.1
to enforce the use of HTTP/1.1.HTTP/1.1
强制使用 HTTP/1.1.HTTP/2
to enable the use of HTTP/2.HTTP/2
启用使用 HTTP/2。HTTP/2 (Prior Knowledge)
to send using HTTP/2 without HTTP/1.1 Upgrade. Use it if you know your server can handle HTTP/2 connections.使用 HTTP/2(Prior Knowledge)
以不使用 HTTP/1.1 升级的方式进行发送。如果您知道服务器可以处理 HTTP/2 连接,请使用它。
To get an overview of the HTTP Client features, you can explore the HTTP Requests Collection, which is a handful selection of composed requests.
为了了解 HTTP 客户端功能的概述,您可以探索HTTP 请求集合,这是一组组合请求的有用选择。
Click the Examples shortcut link on top of the request's editor panel.
单击请求编辑面板顶部的示例快捷链接。In the popup menu, choose the HTTP Requests collection you wish to open:
在弹出菜单中,选择您希望打开的 HTTP 请求集合:
note 注意
See Exploring the HTTP request syntax for the syntax and capabilities overview, and HTTP request in Editor specification for the full format description.
查看 探索 HTTP 请求语法 以了解语法和功能概述,以及 编辑器规范中的 HTTP 请求 进行完整描述。
If you are working with cURL requests, you can convert between cURL requests and the HTTP request in Editor format.
如果您正在使用 cURL 请求进行工作,您可以在 cURL 请求和编辑器的 HTTP 请求格式之间进行转换。
Paste the cURL request into an HTTP request file. IntelliJ IDEA will convert it to the HTTP request format and leave the original cURL request commented out for later reference.
将 cURL 请求粘贴到 HTTP 请求文件中。IntelliJ IDEA 将会将其转换为 HTTP 请求格式,并将原始的 cURL 请求以注释形式保留,以便以后参考。Alternatively, click
on top of the HTTP request editor panel and select Convert cURL to HTTP Request.
或者,点击 HTTP 请求编辑面板顶部的并选择 把 cURL 转换为 HTTP 请求。
In the Convert cURL to HTTP Request dialog, type or paste the cURL request that you want to convert.
在将 cURL 转换为 HTTP 请求对话框中,输入或粘贴您要转换的 cURL 请求。
Consider the following example cURL request:
考虑以下示例 cURL 请求:
curl 'https://httpbin.org/' -H 'Connection: keep-alive' -H 'Accept: text/html' -H 'Accept-Encoding:
gzip, deflate' -H 'Accept-Language: en-US,en;q=0.9,es;q=0.8'
IntelliJ IDEA will convert it to the following:
IntelliJ IDEA 将将其转换为如下所示:
# curl 'http://httpbin.org/' -H 'Connection: keep-alive' -H 'Accept: text/html' -H 'Accept-Encoding: gzip, deflate' -H 'Accept-Language: en-US,en;q=0.9,es;q=0.8'
GET http://httpbin.org/
Connection: keep-alive
Accept: text/html
Accept-Encoding: gzip, deflate
Accept-Language: en-US,en;q=0.9,es;q=0.8
###
The converter supports the following cURL options:
转换器支持以下 cURL 选项:
Option 选项 | Description 描述 |
---|---|
The request method to use. | |
The request header to include in the request. | |
The user's credentials to be provided with the request, and the authorization method to use. | |
The data to be sent in a POST request. | |
The multipart/form-data message to be sent in a POST request. | |
The URL to fetch (mostly used when specifying URLs in a config file). | |
Defines whether the HTTP response headers are included in the output. | |
Enables the verbose operating mode. | |
Enables resending the request in case the requested page has moved to a different location. |
Place the caret at the HTTP request that you want to convert to cURL format.
将光标放置在您想要将其转换为 cURL 格式的 HTTP 请求上。Press ⌥ Option↩Enter and select Convert to cURL and copy to clipboard.
按下 ⌥ Option ↩Enter 并选择 将内容转换为 cURL 并复制到剪贴板。Alternatively, you can click the Convert shortcut link on top of the HTTP request editor panel and select Convert HTTP Request Under Caret to cURL and Copy.
或者,您可以点击 HTTP 请求编辑面板顶部的转换快捷链接,然后选择将光标下的 HTTP 请求转换为 cURL 并复制。
This will generate a cURL request based on the HTTP request and copy it to the clipboard.
这将基于 HTTP 请求生成 cURL 请求并将其复制到剪贴板。
Postman collections is a way to group related HTTP requests together. In Postman, you can export collections as well as variables in JSON format. With the HTTP Client, you can import such files to IntelliJ IDEA to convert them to the respective .http and environment files.
Postman collections(Postman 收藏)是一种将相关的 HTTP 请求组织在一起的方式。在 Postman 中,您可以将收藏以及变量以 JSON 格式导出。通过 HTTP Client,您可以将这些文件导入到 IntelliJ IDEA 中,并将其转换为相应的 .http 和环境文件。
Export a collection from Postman. You can also export environment files if you want to use them in IntelliJ IDEA.
从 Postman 导出一个集合。如果您希望在 IntelliJ IDEA 中使用它们,您也可以导出环境文件。Import the file to IntelliJ IDEA in one of the following ways:
使用以下任一方法将文件导入到 IntelliJ IDEA 中:If the exported file is in your project, right-click it and select Convert Collection to .http File.
如果导出的文件在您的项目中,右键点击它并选择 将集合转换为 .http 文件。Open any .http file, click
in the toolbar, and select Postman Collection.
打开任何.http文件,在工具栏中点击,然后选择Postman 集合。
Press ⌘Сmd⇧Shift0A, start typing
Import from Postman Collection File
, and select the corresponding action.
按下 ⌘Сmd ⇧Shift 0A ,开始输入Import from Postman Collection File
,然后选择相应的操作。
If you also want to import an environment file, select Attach environment and specify the file. It will be converted to the HTTP Client environment format, and this environment will be selected for the specified .http file.
如果你也想导入一个环境文件,请选中附加环境并指定文件。它将被转换为 HTTP 客户端环境格式,并且这个环境将被选择用于指定的.http文件。In the window that appears, click Convert.
在弹出的窗口中,点击转换。
note 注意
You can also quickly import Postman collections by dragging the collection file from your file manager to the IntelliJ IDEA editor area. Instead of just opening the file in the editor, IntelliJ IDEA will convert it to an .http file with corresponding requests in it.
你还可以通过将 Postman 集合文件从文件管理器拖到 IntelliJ IDEA 编辑区域来快速导入。而不仅仅是在编辑器中打开文件,IntelliJ IDEA 将会将其转换为一个具有相应请求的.http文件。
You can quickly generate an HTTP request if you have a URL starting with http
or https
in your code string literals or in JSON, YAML, TOML, and Properties files.
如果您的代码字符串文字或 JSON、YAML、TOML 和 Properties 文件中有以http
或https
开头的 URL,则可以快速生成一个 HTTP 请求。
Click a URL and press ⌥ Option↩Enter.
点击 URL 并按下 ⌥ Option ↩Enter 。In the context menu that opens, click Generate request in HTTP Client.
在打开的上下文菜单中,点击在 HTTP 客户端中生成请求。This will create a new GET HTTP request to the specified URL in the generated-requests.http scratch file.
这将在generated-requests.http刮擦文件中创建一个新的 GET HTTP 请求到指定的 URL。
When working with OpenAPI Specification files, you can create HTTP requests to the specified endpoints.
在使用 OpenAPI 规范 文件进行工作时,您可以创建指定端点的 HTTP 请求。
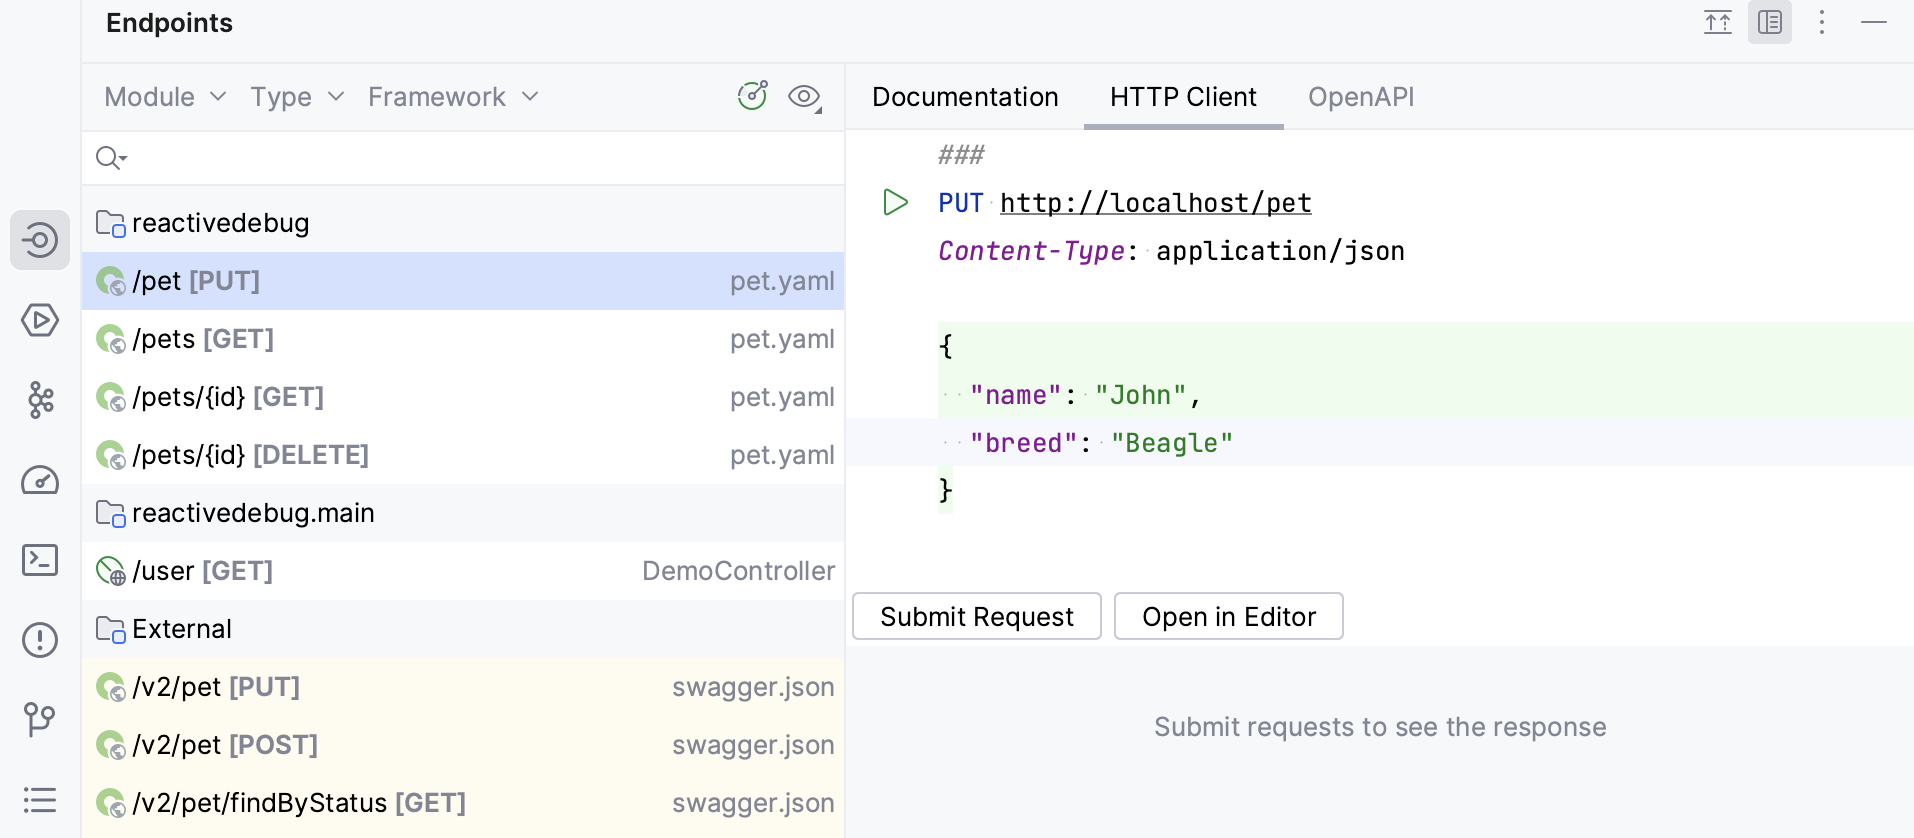
In an OpenAPI specification file, click
in the editor gutter next to the endpoint definition.
在 OpenAPI 规范文件中,在终端点定义旁边的编辑器边栏中点击。
Alternatively, open View | Tool Windows | Endpoints, right-click an endpoint, and select Generate Request in HTTP Client.
也可以打开 View | Tool Windows | Endpoints,右键点击一个节点,然后选择 在 HTTP 客户端中生成请求。
IntelliJ IDEA will create a new HTTP request and save it in the generated-requests.http scratch file.
IntelliJ IDEA 将创建一个新的 HTTP 请求并将其保存在 generated-requests.httpscratch file 中。
If you want to quickly send a request to an endpoint and do not want to save it, you can use the HTTP Client tab in the Endpoints tool window.
如果您想快速向端点发送请求而且不想保存它,则可以使用HTTP 客户端选项卡在端点工具窗口中。
IntelliJ IDEA provides completion for the request URL and for the request body (in JSON format) based on the available OpenAPI specifications. This applies not only to local, but also to remote specifications (add them in the IDE settings to enable completion).
IntelliJ IDEA 根据可用的 OpenAPI 规范为请求 URL 和请求体(以 JSON 格式)提供自动完成。这不仅适用于本地规范,还适用于远程规范 (在 IDE 设置中添加它们 以启用自动完成)。

tip 提示
Use the Rename refactoring to rename the defined endpoint and its usages in HTTP requests simultaneously.
使用重命名重构将定义的端点和其在 HTTP 请求中的使用同时重命名。
Do any of the following:
做以下任何一项:In an OpenAPI specification file, place the caret at the endpoint's definition you want to rename.
在 OpenAPI 规范文件中,将光标放在你想要重命名的端点定义上。In an HTTP request file, place the caret at the URL path segment you want to rename.
在 HTTP 请求文件中,将插入符放置在您想重命名的 URL 路径段上。
Select Refactor | Rename from the main menu or the context menu, or press ⇧ShiftF6.
从主菜单或上下文菜单中选择重构 | 重命名,或按下 ⇧Shift F6 。In the Rename dialog that opens, specify the new endpoint's name.
在打开的重命名对话框中,指定新端点的名称。Preview and apply changes.
预览并应用更改。
IntelliJ IDEA will rename the endpoint and its usages.
IntelliJ IDEA 将重命名端点及其使用情况。
With response handler scripts, you can programmatically react to a received HTTP response. By using these scripts, you can automatically process the received data as well as validate it against the conditions that you specify. Response handler scripts are provided as a part of the request within the HTTP request file and are executed as soon as a response is received. To view the response handling examples, open the Requests with Authorization or Requests with Tests and Scripts requests collections.
使用响应处理程序脚本,您可以以编程方式对收到的 HTTP 响应作出反应。通过使用这些脚本,您可以自动处理接收到的数据,并根据您指定的条件进行验证。响应处理程序脚本作为 HTTP 请求文件中的一部分提供,并在收到响应时立即执行。要查看响应处理的示例,请打开具有授权的请求或测试和脚本的请求集合。
With pre-request scripts, you can set variables used in HTTP requests.
通过预先请求脚本,您可以设置在 HTTP 请求中使用的变量。
You can insert a response handler script into your request in-place or by referring to an external file.
您可以将响应处理程序脚本直接插入到您的请求中,或者通过引用外部文件来实现。
To insert the script in-place, prepend it with
>
and enclose it in{% %}
:
要在原地插入脚本,请在其前面加上>
并将其括在{% %}
中:GET host/api/test > {% // Response Handler Script ... %}
To insert the script from an external file, prepend it with
>
:
要插入外部文件中的脚本,请在其前面添加>
:GET host/api/test > scripts/my-script.js
If there is any output from the response handler script (errors or output from client.log), it is shown in the Response Handler tab of the Services tool window when you run the request.
如果响应处理程序脚本有任何输出(错误或client.log中的输出),当您运行请求时,将显示在响应处理程序选项卡和服务工具窗口中。
You can insert a pre-request script into your request in-place or by referring to an external file.
您可以将预先请求脚本直接插入到请求中,或者通过引用外部文件进行插入。
To insert the script in-place, prepend it with
<
and enclose it in{% %}
:
要在原地插入脚本,请在前面添加<
,并用{% %}
括起来:< {% request.variables.set("petName", "Bella") %} POST https://example.org/pets/{{petName}}
To insert the script from an external file, prepend it with
<
:
要从外部文件插入脚本,请在前面加上<
:< scripts/my-script.js POST https://example.org/pets/{{petName}}
If there is any output from the pre-request script (errors or output from client.log), it is shown in the Pre-request Handler tab of the Services tool window when you run the request.
如果 Pre-request 脚本中有任何输出(错误或client.log的输出),则在运行请求时,该输出将显示在Pre-request Handler选项卡中的Services工具窗口中。
Sometimes, you may need to use specific functionalities, such as variables or functions, from external files. For this, in pre-request and response handler scripts, you can use the regular ES6 import feature to access variables and functions defined in local JavaScript files.
有时候,你可能需要使用来自外部文件的特定功能,比如变量或函数。为了实现这一点,在预请求和响应处理器脚本中,你可以使用常规的 ES6 导入功能来访问在本地 JavaScript 文件中定义的变量和函数。
Export the needed values from a JavaScript file. The HTTP Client supports
export
statements in the following formats:
从 JavaScript 文件中导出所需的值。HTTP Client 支持以下格式的导出
语句:export let name1, name2/*, … */; // also var export const name1 = 1, name2 = 2/*, … */; // also var, let export function functionName() { /* … */ } export { name1, /* …, */ nameN }; export { variable1 as name1, variable2 as name2, /* …, */ nameN }; export default expression; export default function functionName() { /* … */ } export default function () { /* … */ }
Import the needed values into your response handler or pre-request script. The HTTP Client supports
import
statements in the following formats:
将所需的值导入到您的响应处理程序或预请求脚本中。HTTP 客户端支持以下格式的import
语句:import defaultExport from "module-name"; import * as name from "module-name"; import { export1 } from "module-name"; import { export1 as alias1 } from "module-name"; import { export1, export2 } from "module-name"; import { export1, export2 as alias2, /* … */ } from "module-name"; import defaultExport, { export1, /* … */ } from "module-name"; import defaultExport, * as name from "module-name"; import "module-name"; // side effect import
note 注意
If you want to run some tests from an external file and do not need to import anything from them, you can use side effect import in your response handler script, for example
import 'test-scripts/mytests'
. This can be useful if you have common tests and want to reuse them in multiple requests while also keeping the ability to write (or import) individual tests for some requests.
如果您想从外部文件运行一些测试,并且不需要从中导入任何内容,您可以在响应处理程序脚本中使用 副作用导入 ,例如import 'test-scripts/mytests'
。这对于拥有常见测试并希望在多个请求中重用它们的情况非常有用,同时还可以保持编写(或导入)某些请求的单独测试的能力。
Response handler scripts and pre-request scripts are written in JavaScript ECMAScript 2023, with coding assistance and documentation handled by the bundled HTTP Pre-Request and Response Handler
library. For in-place scripts, this functionality is enabled automatically. For external scripts, you need to enable it manually.
响应处理程序脚本和预请求脚本是用 JavaScript ECMAScript 2023 编写的,使用捆绑的 HTTP Pre-Request and Response Handler
库进行编码辅助和文档处理。对于原地脚本,此功能会自动启用。对于外部脚本,您需要手动启用。
Enable JavaScript coding assistance for response handler and pre-request scripts
为响应处理程序和预请求脚本启用 JavaScript 编码辅助
Press ⌘Сmd⇧Shift0A (Find Action).
按下 ⌘Сmd ⇧Shift 0A (查找操作)。Type Use JavaScript Library, click the corresponding action, and, in the context menu that opens, select HTTP Pre-Request and Response Handler.
键入 使用 JavaScript 库,点击相应的操作,然后,在打开的上下文菜单中选择 HTTP 预请求和响应处理程序。
The HTTP Response Handler
library exposes two objects to be used for composing response handler scripts:HTTP Response Handler
库公开了两个对象,用于组合响应处理程序脚本:
The
client
object stores the session metadata, which can be modified inside the script. Theclient
state is preserved until you close IntelliJ IDEA. Every variable saved inclient.global
asvariable_name
is accessible to subsequent HTTP requests as{{variable_name}}
.客户端
对象存储会话元数据,可以在脚本内部进行修改。客户端
状态会一直保留,直到关闭 IntelliJ IDEA。在client.global
中保存的每个变量变量名
都可以在后续的 HTTP 请求中作为{{variable_name}}
访问到。response
holds information about the received response: its content type, status, response body, and so on.response
包含有关接收到的响应的信息:其内容类型、状态、响应主体等等。
To open the HTTP Response Handler library in the editor, place the caret at the library object and press ⌘Сmd0B.
要在编辑器中打开HTTP 响应处理程序库,请将插入符放置在库对象上,并按下 ⌘Сmd 0B 。
Response handler scripts can include tests, which lets you use the HTTP Client as a testing framework. To create a test, invoke the client.test(testName, function)
method. Inside the test, you can assert a condition by invoking the client.assert(condition, message)
method, for example:
响应处理脚本可以包含测试,使您可以将 HTTP 客户端用作测试框架。要创建一个测试,请调用 client.test(testName, function)
方法。在测试中,您可以通过调用 client.assert(condition, message)
方法来断言一个条件,例如:
GET https://httpbin.org/status/200
> {%
client.test("Request executed successfully", function() {
client.assert(response.status === 200, "Response status is not 200");
});
%}
If you have multiple requests in your .http file, the Structure tool window can be useful to quickly preview the file and navigate through it. The tool window also shows the request parts, such as headers, the request bodies, pre-request scripts, and response handler scripts.
如果您的.http文件中有多个请求,则结构工具窗口可用于快速预览文件并通过其进行导航。该工具窗口还显示请求的各个部分,例如标头、请求正文、预请求脚本和响应处理程序脚本。
Open the Structure tool window: View | Tools Windows | Structure.
打开 结构 工具窗口:视图 | 工具窗口 | 结构。Alternatively, press ⌘Сmd07.
或按下 ⌘Сmd 07 。In the Structure tool window, click an HTTP method or request name, or any part of the request.
在 结构 工具窗口中,单击一个 HTTP 方法或请求名称,或请求的任何部分。

You can also send requests from there by right-clicking it and selecting .
您还可以通过右键单击它并选择 来发送请求。
If you are going to test your own web service, make sure it is deployed and running.
如果您要测试自己的网络服务,请确保它已经部署并运行。If you have environments defined, select an environment in the Run with list on top of the request's editor panel.
如果您定义了环境,请在请求编辑面板顶部的运行环境列表中选择一个环境。In the gutter, click
next to the request.
在排水沟中,点击请求旁边的。
You can run all requests from your .http file at once. This can be useful for complex scenarios such as requesting particular data from a server, saving it as a client.global variable, and sending a subsequent request containing that data.
您可以一次运行来自您的 .http 文件的所有请求。这对于复杂的场景非常有用,比如从服务器请求特定数据,将其保存为 client.global 变量,然后发送一个包含该数据的后续请求。
Open an .http file.
打开一个 .http 文件。On top of the editor panel, click
(Run All Requests in File).
在编辑器面板顶部,点击(运行文件中的所有请求)。
When a request is executed, IntelliJ IDEA automatically creates a dedicated temporary HTTP Request run/debug configuration for it. You can save it as a permanent run/debug configuration if necessary.
当执行请求时,IntelliJ IDEA 会自动为其创建一个专用的临时HTTP 请求运行/调试配置。如有必要,您可以将其保存为永久的运行/调试配置。
You can open an HTTP request in the browser specified on the Web Browsers and Preview page of the Settings dialog (⌘Сmd0,) .
您可以在“Web 浏览器和预览”页的设置对话框( ⌘Сmd 0, )中打开浏览器发起 HTTP 请求。
Press ⌥ Option↩Enter and select the Open in web browser intention action.
按下 ⌥ Option ↩Enter ,然后选择在网页浏览器中打开意图操作。
When you execute an HTTP request from the editor, IntelliJ IDEA automatically creates a temporary run/debug configuration with the request parameters. A temporary run/debug configuration works the same way as a permanent run/debug configuration. You can change its settings using the Run/Debug Configuration dialog and optionally save it as permanent.
当您在编辑器中执行 HTTP 请求时,IntelliJ IDEA 会自动创建一个临时的运行/调试配置,其中包含请求参数。临时的运行/调试配置与永久的运行/调试配置使用方式相同。您可以使用运行/调试配置对话框更改其设置,并可选择将其保存为永久性配置。
Do any of the following:
请执行以下任一操作:In the editor, right-click a request and in the context menu, select Modify Run Configuration....
在编辑器中,右键单击请求,在上下文菜单中选择修改运行配置...。Alternatively, go to Run | Edit Configurations in the main menu, and select the needed run/debug configuration in the HTTP Request list.
或者,转到运行|编辑配置下的主菜单,并在HTTP 请求列表中选择所需的运行/调试配置。
Change the needed configuration parameters:
更改所需的配置参数:In the Environment list, select an environment that will define the set of environment variables used in the request.
在环境列表中,选择一个环境,该环境将定义请求中使用的环境变量的集合。In the File field, provide the path to the HTTP request file. You can type the path manually and use path completion ⌃CtrlSpace as you type, or click
and select the required folder in the dialog that opens.
在文件字段中,提供HTTP 请求文件的路径。您可以手动输入路径并使用路径自动完成 ⌃Ctrl Space ,也可以点击并在打开的对话框中选择所需文件夹。
If your request file contains multiple requests, in the Request list, choose the name of the request to execute.
如果您的请求文件包含多个请求,在请求列表中选择要执行的请求的名称。
Do any of the following:
做以下任何一项:
In the Run/Debug Configuration selector, choose Save <configuration name>.
在 运行/调试配置 选择器中,选择 保存 < 配置名称>。In the Run/Debug Configuration dialog, select the configuration and click
.
在运行/调试配置对话框中,选择配置并单击。
Do any of the following:
做以下任何一项操作:
In the Run/Debug Configuration selector, select the desired run configuration. Then click
on the main toolbar or press ⌃Ctrl0R.
在运行/调试配置选择器中,选择所需的运行配置。然后点击工具栏上的按钮或按下 ⌃Ctrl 0R 。
Press ⌃Ctrl⌥ Option0R, select the desired run configuration from the list, and press ↩Enter.
按下 ⌃Ctrl ⌥ Option 0R ,从列表中选择所需的运行配置,并按下 ↩Enter 。
When you execute an HTTP request, IntelliJ IDEA automatically saves the response into a separate file under the .idea
当您执行 HTTP 请求时,IntelliJ IDEA 会自动将响应保存到.idea

Switch to the Services tool window, which opens automatically as soon as a response is received.
切换到“服务”工具窗口,该窗口在接收到响应时会自动打开。By default, the server response is shown in the format specified in the request header via the content-type field. To have the response converted into another format, click
and select Text, JSON, XML, or HTML.
默认情况下,服务器响应以请求头中指定的格式显示,通过 content-type 字段。若要将响应转换为其他格式,请点击并选择 文本、JSON、XML 或 HTML。
If the response contains a binary file, this file is also saved under the .idea
如果响应中包含二进制文件,则该文件也会保存在.idea
Preview the image the Services tool window:
预览图像服务工具窗口:

Preview the PDF file the Services tool window. To disable showing PDF preview in the Services tool window, click and clear the Enable PDF preview inline option.

If the response is an HTML file, you can click Show Preview to preview it in the editor tab using the JCEF-based browser.

If you have a response handler script, the results of the tests executed as part of this script are displayed on the Tests tab of the Services tool window. You can click each of the tests to quickly navigate to the test source code in the corresponding response handler script.

If you subscribe to an event stream, IntelliJ IDEA displays events in the Services tool window. Here, you can also view the status of the client-server connection and terminate it by clicking . Depending on the content type (either
text/event-stream
or application/x-ndjson
), the response will be formatted as plain text or newline-delimited JSON. You can write a response handler script to process each line of the event stream.

Redirecting stream events to a file is currently not supported.
Place the caret at the link to the response you want to open.
In the main menu, go to View | Jump to Source, or press ⌘Сmd0B or ⌘Сmd0↓
Alternatively, you can ⌘СmdClick the response line.
The HTTP Client supports JSONPath queries, enabling you to parse and extract data from received JSON documents. To do this, use the following function in your response handler script:
jsonPath(ObjectToParse, JSONPathExpression)
Use the jsonPath
live template to quickly insert this function.
After the request, in the response handler script part, start typing
> jsonPath
.Press ↩Enter to expand the live template and complete the JSONPath expression.
For example, this expression will retrieve and print the value of the
title
field of the first element within theslides
array, which is a part of theslideshow
object:GET https://examples.http-client.intellij.net/json > {% client.log(jsonPath(response.body, "$.slideshow.slides[0].title",)) %}
Preview the obtained value in the Response Handler tab of the Services tool window.
The HTTP Client supports XPath expressions, enabling you to parse and extract data from received XML documents.
HTTP 客户端支持 XPath 表达式,使您能够解析和提取接收到的 XML 文档中的数据。
In your response handler script, use the following function:
在你的 响应处理程序中,使用下面的函数:xpath(XMLToParse, XPathExpression)
In
XMLToParse
enter the XML content to be parsed (for example,response.body
), and inXPathExpression
enter your XPath expression.
在XMLToParse
中输入要解析的 XML 内容(例如,response.body
),并在XPathExpression
中输入您的 XPath 表达式。
For example: 例如:
GET https://examples.http-client.intellij.net/xml
> {%
client.log(xpath(response.body, '//slide[@type="all"][1]/title/text()'))
%}
When a request is executed from a scratch file, the link to the response output file is added below the original request.
当从一个临时文件执行请求时,响应输出文件的链接将添加在原始请求下方。
Do any of the following:
做以下任何一项:Place the caret at the link to the response file. Press ⌥ Option↩Enter and select the Compare with <response name> intention action.
Click
in the gutter and select Compare with <response name> from the list:
When a request is executed from a physical file, the link to the response output is added to the requests' history.
Place the caret at the link to the response file. In the main menu, go to View | Jump to Source, or press ⌘Сmd0B or ⌘Сmd0↓ to open this file in a new editor tab.
Go to View | Compare With in the main menu, or press ⌘Сmd0D. IntelliJ IDEA will prompt you to open a response file from the httpRequests folder.
Select the response file you would like to compare the current file with and click Open.
The two response files will be opened in the Diff Viewer allowing you to compare their contents:

IntelliJ IDEA automatically saves the 50 recently executed requests into the http-requests-log.http file, which is stored on the project level under the .idea
note
To prevent saving a request to the request history, add a comment line with the @no-log tag before the request. This can be helpful in case a request contains some sensitive data, and you don't want to log it.
Click
on top of the request's editor panel.
点击请求编辑面板顶部的。
Select Tools | HTTP Client | Show HTTP Requests History from the main menu.
从主菜单中选择 工具 | HTTP 客户端 | 显示 HTTP 请求历史记录。
The HTTP Client can redirect output to a custom file or directory. It supports two operators for force and soft redirects:
HTTP 客户端可以将输出重定向到自定义文件或目录。它支持两种操作符用于强制重定向和软重定向:The
>>
operator always creates a new file, adding an-n
suffix to a filename if the requested filename already exists.>>
运算符总是创建一个新文件,如果所请求的文件名已经存在,则在文件名后添加一个-n
后缀。The
>>!
operator rewrites the file if it already exists.>>!
运算符会在文件已存在的情况下重新写入该文件。
The cookies received through a response are automatically saved into the dedicated http-client.cookies file under the .idea
收到的 cookies 将自动保存在专用的http-client.cookies文件中,位于.idea
If you want a cookie to never expire, you can enter -1
as the date
parameter. For example:
如果您希望 cookie 永不过期,您可以将-1
输入为日期
参数。例如:
# domain path name value date
.example.com / userId 0x4d2 -1

note
You can prevent saving the received cookie to the cookie jar by adding a comment line with the @no-cookie-jar tag before the request.
If you want to set custom cookies in an HTTP request, you can use the Cookie
header. Enter your cookies as a list of name=value
pairs separated by a semicolon, for example:
GET http://localhost:80/api
Cookie: theme=dark; country=France
note 笔记
To work with gRPC requests, you need to install and enable the following plugins: Protocol Buffers and gRPC.
The HTTP Client supports gRPC requests. For the HTTP Client to treat your requests as gRPC requests, start them with the GRPC
keyword.
Based on a .proto
file, IntelliJ IDEA provides completion for gRPC: all known gRPC services, unary and server-streaming methods of a particular server, and fields of accepted messages in the request body. If you don’t have a .proto
file in your project, code completion can still be available if a server supports gRPC reflection, which provides HTTP clients with information about accessible services.

In the proto file, click
Generate request in HTTP Client near the RPC method.
在 proto 文件中,点击在 HTTP 客户端中生成请求 附近的 RPC 方法。
Gif
Just like for HTTP requests, you can also use the Endpoints tool window to generate gRPC requests.
就像对于 HTTP 请求一样,您还可以使用Endpoints工具窗口来生成 gRPC 请求。
Open the Endpoints tool window: View | Tool Windows | Endpoints. You will see gRPC endpoints if they are defined in your project.
打开Endpoints工具窗口:查看 | 工具窗口 | Endpoints。如果您的项目中定义了 gRPC 端点,您将看到它们。Select an endpoint. This will generate a sample request to it in the HTTP Client tab.
选择一个端点。这将在HTTP 客户端选项卡中为其生成示例请求。Complete the request and click Submit Request. You may need to substitute the default address and port with your own values. For the request body, use code completion based on the data structure in the proto file.
完成请求并单击 提交请求。您可能需要使用自己的值替换默认地址和端口。对于请求正文,请根据 proto 文件中的数据结构使用代码完成。Preview the response in the lower part of the the HTTP Client tab.
在“HTTP 客户端”选项卡的下半部分预览响应。

Below your
GRPC
request, enter gRPC metadata using the following syntax:Metadata-key: Value
.
在您的GRPC
请求下,使用以下语法输入 gRPC 元数据:Metadata-key: Value
。For example: 例如:
GRPC localhost:8080 X-Myhostname: Example.org
You can initiate connections secured by server-side TLS.
您可以发起由服务器端 TLS 保护的连接。
Before the address, enter
grpcs
, for example:
在地址之前,输入grpcs
,例如:GRPC grpcs://ijhttp-examples.jetbrains.com/hello.HelloService/SayHello
tip 提示
Specifying the client-side certificate is currently not supported in gRPC requests.
当前不支持在 gRPC 请求中指定客户端证书。
note 笔记
Currently, the supported RPC types that can be executed in the HTTP Client are unary and server-streaming. Like in ordinary HTTP requests, the request body and responses are plain JSON files.
目前,在 HTTP 客户端中支持执行的 RPC 类型是一元和服务器流式。与普通的 HTTP 请求类似,请求体和响应都是普通的 JSON 文件。
The HTTP Client supports WebSocket requests. For the HTTP Client to treat your request as a WebSocket request, start it with the WEBSOCKET
keyword followed by a server address. The request has the following structure:
HTTP Client 支持 WebSocket 请求。为了使 HTTP 客户端将您的请求视为 WebSocket 请求,请以服务器地址后面跟随 WEBSOCKET
关键字来启动它。请求具有以下结构:
WEBSOCKET ws://localhost:8080/websocket
Content-Type: application/json // Used for content highlighting only
// Request body, for example:
{
"message": "First message sent on connection"
}
=== // message separator
{
"message": "Second message" // will be sent right after the previous one
}
=== wait-for-server // keyword used to wait for the server response
{
"message": "Send this after the server response"
}
note 注意
While the
Content-Type
header is not used in WebSocket connections, you can use it IntelliJ IDEA WebSocket requests to highlight syntax of transmitted data.
虽然 WebSocket 连接中不使用Content-Type
头,但您可以在 IntelliJ IDEA WebSocket 请求中使用它来突出显示传输数据的语法。
To speed up composing a WebSocket request, you can:
为了加快组成 WebSocket 请求的速度,您可以:
Click
on top of the editor panel of an .http file and select WebSocket Request.
点击编辑器面板的顶部,然后选择WebSocket 请求,以修改.http文件。
In an .http file, type
wsr
and press ↩Enter to apply the WebSocket live template.
在一个 .http 文件中,键入wsr
,然后按下 ↩Enter 来应用 WebSocket 实时模板。
Use the
===
separator to send multiple messages:
使用===
分隔符发送多个消息:{ "message": "First message sent on connection" } === // message separator { "message": "Second message" } === { "message": "Third message" }
Before a message, enter
=== wait-for-server
.
在发送消息前,请输入=== wait-for-server
。This will make the HTTP Client wait for the server response before sending the message. You can wait for multiple responses by repeating the
=== wait-for-server
line. For example, the following message will be sent after 3 server responses:
这将使 HTTP 客户端在发送消息之前等待服务器响应。您可以通过重复=== wait-for-server
行来等待多个响应。例如,以下消息将在 3 个服务器响应之后发送:=== wait-for-server === wait-for-server === wait-for-server { "message": "This messages is sent after 3 server responses" }
Once you have initiated a connection, you can interact with your server right from the Services tool window. You can send messages and view server responses to each new message.
一旦您建立了连接,您就可以直接从服务工具窗口与服务器进行交互。您可以发送消息并查看每条新消息的服务器响应。
In the Services tool window, select an opened connection.
在 服务 工具窗口中,选择一个已打开的连接。In the lower part of the window, under Message to be sent to WebSocket, enter the message content.
在窗口的下半部分,在要发送到 WebSocket 的消息下方,输入消息内容。To the right of it, select the message format: plain text, JSON, XML, or HTML.
选择其右侧的消息格式: 纯文本,JSON,XML 或 HTML。Press ⌘Сmd↩Enter to send the request.
按下 ⌘Сmd ↩Enter 发送请求。
In the upper part of the window, you'll see the server response.
在窗口的上半部分,您会看到服务器的响应。

IntelliJ IDEA provides support for sending GraphQL operations in the HTTP request body. You can send them over HTTP or WebSocket.
IntelliJ IDEA 提供了在 HTTP 请求体中发送 GraphQL 操作的支持。您可以通过 HTTP 或 WebSocket 发送它们。
tip 小费
In an .http file, enter the
GRAPHQL
keyword followed by a server address.
在一个.http文件中,输入GRAPHQL
关键字,后跟服务器地址。In the request body, compose your GraphQL operation (query, mutation, or subscription), for example:
在请求体中,编写您的 GraphQL 操作(查询、变异或订阅),例如:### HTTP request with GraphQL query GRAPHQL http://localhost:8080/graphql query { toDos { title, completed, author { username } } }
To speed up composing an HTTP request with a GraphQL query, you can:
为了加快使用 GraphQL 查询构建 HTTP 请求,您可以:
Click
on top of the editor panel of an .http file and select GraphQL Query Request.
点击编辑器面板顶部的,然后选择 GraphQL 查询请求 的 http 文件。
In an .http file, type
gqlr
and press ↩Enter to apply the GraphQL live template.
在一个 .http 文件中,输入gqlr
并按下 ↩Enter 应用 GraphQL 活动模板。
In the HTTP request body, you can use GraphQL variables if you want to pass some dynamic data separately from the query string.
在 HTTP 请求体中,如果您想从查询字符串分离出一些动态数据,您可以使用 GraphQL 变量。
After the query part, enter a JSON variables dictionary:
在查询部分之后,输入一个 JSON 变量字典:query ($name: String!, $capital: String!) { country(name: $name, capital: $capital) { name capital } } { "name": "France", "capital": "Paris" }
You can also use HTTP Client environment variables as GraphQL variable values. For example, in this JSON,
"{{Author}}"
is an environment variable; its value at runtime depends on the environment that you select while sending the request:
您还可以将HTTP Client 环境变量作为 GraphQL 变量值使用。例如,在此 JSON 中,"{{Author}}"
是一个环境变量;它在运行时的值取决于您在发送请求时选择的环境:{ "author": "{{Author}}" }
note 注意
You can quickly add a variable block to the GraphQL query by pressing ⌥ Option↩Enter (Show Context Actions) in the request body and selecting Add GraphQL JSON variables block.
你可以通过在请求正文中按下 ⌥ Option ↩Enter (显示上下文操作)并选择 添加 GraphQL JSON 变量块,快速将变量块添加到 GraphQL 查询中。
If you use GraphQL in your Spring applications, you can quickly create HTTP requests from your controller source code using the dedicated gutter icon.
如果您在 Spring 应用中使用 GraphQL,您可以使用专用的边栏图标从控制器源代码快速创建 HTTP 请求。
tip 提示
To use this feature, install and enable the GraphQL and Spring GraphQL plugins.
要使用此功能,请安装并启用GraphQL和Spring GraphQL插件。IntelliJ IDEA suggests installing the Spring GraphQL plugin if it detects GraphQL dependencies in your Spring project.
IntelliJ IDEA 在检测到 Spring 项目中存在 GraphQL 依赖时建议安装Spring GraphQL 插件。
In your Spring controller code, click
in the gutter next to the
@QueryMapping
,@MutationMapping
, or@SubscriptionMapping
annotation.
在您的 Spring 控制器代码中,单击位于@QueryMapping
、@MutationMapping
或@SubscriptionMapping
注解旁边的。
In the context menu that opens, select Generate request in HTTP Client.
在打开的上下文菜单中,选择在 HTTP 客户端中生成请求。

This will add a new GRAPHQL
request to the generated-requests.http file.
这将向生成的请求.html 文件中添加一个新的GRAPHQL
请求。
In the Settings dialog (⌘Сmd0,) , choose System Settings under Appearance & Behavior, then choose HTTP Proxy.
在 设置 对话框( ⌘Сmd 0, ) 中, 在 外观和行为 下选择 系统设置, 然后选择 HTTP 代理。In the HTTP Proxy dialog that opens, select Manual proxy configuration and specify the following:
在打开的HTTP 代理对话框中,选择手动配置代理并指定以下内容:Enter the proxy host name and port number in the Host name and Port number fields.
在主机名和端口号字段中输入代理主机名和端口号。To enable authorization, select the Proxy authentication checkbox and type the username and password in the corresponding fields.
要启用授权,请选择代理身份验证复选框,并在相应的字段中输入用户名和密码。
If an HTTP server requires SSL/TLS authentication for secure communication, you may need to specify the client certificate before sending an HTTPS request. In the HTTP Client, you can set up the client certificate using the private environment file.
如果 HTTP 服务器需要 SSL/TLS 身份验证进行安全通信,在发送 HTTPS 请求之前,您可能需要指定客户端证书。在 HTTP 客户端中,您可以使用私有环境文件设置客户端证书。
tip 小费
Currently, configuring an SSL/TLS certificate is not supported in HTTP Client CLI (you can vote for the feature request in IJPL-69643). The only supported SSL-related setting in HTTP Client CLI is the ability to disable certificate verification.
当前在HTTP 客户端 CLI中不支持配置 SSL/TLS 证书(您可以在IJPL-69643中投票支持此功能请求)。HTTP 客户端 CLI 中唯一支持的 SSL 相关设置是禁用证书验证的能力。
In an .http file, in the Run with list, select Add Environment to Private File.
In the http-client.private.env.json file that opens, add the
SSLConfiguration
object to the needed environment. InclientCertificate
, enter a path to your client certificate. If a certificate key is stored in a separate file, enter its path inclientCertificateKey
. For example:{ "dev": { "MyVar": "SomeValue", "SSLConfiguration": { "clientCertificate": "cert.pem", "clientCertificateKey": "MyFolder/key.pem" } } }
tip
You can specify an absolute path or a path relative to the http-client.private.env.json file. If the environment file is stored in scratches, you can additionally specify a path relative to your project root. Start typing a path to get the code completion popup.
Alternatively, you can describe
clientCertificate
andclientCertificateKey
as objects, which lets you specify the certificate format in addition to the path. For example:{ "dev": { "SSLConfiguration": { "clientCertificate": { "path": "file.crt", "format": "PEM" }, "clientCertificateKey": { "path": "file.key", "format": "DER" } } } }
If you used a passphrase when generating your client certificate, you should provide it to the HTTP Client.
In the http-client.private.env.json file, add
"hasCertificatePassphrase": true
to theSSLConfiguration
object, for example:{ "dev": { "SSLConfiguration": { "clientCertificate": "file.crt", "hasCertificatePassphrase": true } } }
Click
in the gutter or, with the caret placed at
hasCertificatePassphrase
, press ⌥ Option↩Enter and select Set value for 'Certificate passphrase'.In the window that opens, enter your certificate passphrase.
You can omit the second step if you do not want to enter the passphrase now. In this case, IntelliJ IDEA will prompt you to enter the passphrase when you execute an HTTPS request.
For development purposes, you may have a host with self-signed or expired certificates. If you trust this host, you can disable verification of its certificate.
In the http-client.private.env.json file, add
verifyHostCertificate": false
to theSSLConfiguration
object. For example:{ "sslTest": { "SSLConfiguration": { "verifyHostCertificate": false } } }
If you run a request with this environment, IntelliJ IDEA will not verify host certificates.
Thanks for your feedback!