Nakajima Ki84 Army Type 4 Fighter Hayate Hasegawa 1/72
长谷川早苗 1/72 比例中岛 Ki84 陆军 4 型战斗机
|
|
|
|
 This is the fuselage of Hasegawa 1/72 kit. Its distance and angle is the same as the 104 Sentai camouflaged Otsu model. 这是长谷川 1/72 套件的机身。其距离和角度与 104 Sentai 迷彩大津模型相同。 |
 Drawings. 图纸 |
 Drawings is overlaid on the kit. The height of the front fuselage is taller by 2mm (.08"). The inclination angle from the canopy to cowl is steep. The distance from the cowl to wing leading edge is long. 图纸覆盖在套件上。前机身高度增加了 2 毫米(0.08 英寸)。座舱盖与整流罩之间的倾角较陡。整流罩到机翼前缘的距离较长。 |
 The camouflaged Otsu model of the 104 Sentai 伪装的 104 千岁大津模型 |
 The opening of the cowl is small and low. So the "forehead" looks swelled. I felt this face was alike the creature of the movie "Alien". 头罩的开口又小又低。所以 "额头 "看起来很膨胀。我觉得这张脸很像电影《异形》中的怪物。 |
 The fuselage cross section shape is basically correct. The upper fuselage at the cowl to canopy is slim. 机身横截面形状基本正确。机身上部从整流罩到座舱盖的部分比较纤细。 |
|
根据上述核查结果,确定了施工方案。机身高度将降低。机头将缩短。修正前整流罩的形状。顶篷将从头开始制作。 |
 At first, the cowl was cut off with etching saw. The center exhaust stucks were cut out (it would be re-used after). Then the fuselage was cut into halves with a craft knife. 首先,用蚀刻锯锯掉了引擎罩。中间的排气管也被切掉(之后会重新使用)。然后用工艺刀将机身切成两半。 |
 In order to correct the nose inclination angle, the upper half was cut at #5 frame, slid by 1mm (.04") and rejoined. The portion painted in black was sanded off. 为了纠正机头的倾斜角度,上半部分在 5 号框架处被切割,滑动 1 毫米(0.04 英寸)后重新接合。涂黑的部分被打磨掉。 |
 The port fuselage was corrected and the starboard one was not yet corrected. Note the cutting surface (black). 左侧机身已校正,右侧机身尚未校正。注意切割面(黑色)。 |
 The upper one is before correction, the lower is after correction. The corrected fuselage is significantly thin. 上图为校正前,下图为校正后。修正后的机身明显变薄。 |
 This is True Details' resin cockpit set which I bought long ago. Sorry, I don't know it is available now. 这是我很久以前买的 True Details 树脂驾驶舱套件。抱歉,我不知道现在还有卖的。 |
 The front portion of the side wall was cut off. Because, the reinforcement plastic sheet (white) interferes. 侧壁的前部被切掉了。因为,加固塑料板(白色)干扰了。 |
 The front cowl was widened and shims were inserted. Then the front cowl was rejoined and sanded. In order to check the correctness of its shape, contour lines were drawn with a pencil. 加宽前罩并插入垫片。然后重新接合并打磨前罩。为了检查其形状是否正确,用铅笔画出了轮廓线。 |
 The side portion of the cowl was pressed vertically to fit to the side view and cross section drawings. The inside of the cowl was reinforced with CA glue and plastic powder. 整流罩的侧面部分是垂直压制的,以符合侧视图和横截面图。整流罩内部用 CA 胶水和塑料粉加固。 |
 The outline of the cowl was sanded with checking by the template which was cut from drawings. Panel lines were drawn with a pencil to check the outline image. 根据图纸裁剪的模板对引擎罩的轮廓进行打磨和检查。用铅笔画出面板线,以检查轮廓图像。 |
 To check the image, the kit canopy was temporary put on. The actual canopy would be heat formed. 为了检查图像,我们临时安装了套件顶篷。实际的顶篷是热成型的。 |
|
The wing position was a little low in a relation with the fuselage. So the wing position was simultaneously corrected in correction works of the fuselage height. The kit rudder was narrow at its lower portion (this portion was leaded to the fuselage). So 0.5mm (.02") plastic sheet was inserted between left and right half fuselage parts. On the other side, the upper portion of the kit rudder was a little thick. So this portion was sanded to be thin. The upper side portion of the cowl (the side of engine air intake duct) was sanded adequately. As the result of sanding, the kit cowl parts was almost taken away and white plastic powder of inside reinforcement could be seen through. 机翼位置与机身相比略低。因此,在校正机身高度时同时校正了机翼位置。套件的方向舵下部较窄(该部分与机身相连)。因此在左右两半机身部件之间插入了 0.5 毫米(0.02 英寸)的塑料板。另一方面,套件方向舵的上半部分有点厚。因此这部分被打磨得很薄。整流罩的上侧部分(发动机进气管的一侧)经过了适当的打磨。打磨的结果是,套件的整流罩部件几乎被打磨掉了,可以看到里面加固的白色塑料粉末。 Now, as the result of this correction, the new fuselage appeared. The 3D image of this object was quite different from familiar-looking of existing old Hayate kits. So, at first, I thought I might make mistakes. But when I saw it from the same angle as documentary photos, it was completely similar to the actual aircraft. I think this odd feeling is caused by a imprinting of old kits. 现在,作为修正的结果,新的机身出现了。这个物体的 3D 图像与现有旧 Hayate 套件的熟悉外观大相径庭。因此,一开始我以为自己可能会出错。但当我从与资料照片相同的角度看它时,却发现它与实际飞机完全相似。我认为这种奇怪的感觉是由旧套件的印记造成的。 In addition, I think there is a gap between a drawings and a 3D object. If you make model fuselage in correct dimension as drawings, you feel that the model is a little thin. This feeling was felt when I built Spitfire as well. My drawing fuselage looks thicker than the actual aircraft. 此外,我认为图纸和三维物体之间存在差距。如果按照图纸上的正确尺寸制作模型机身,你会觉得模型有点单薄。我在制作喷火战斗机时也有这种感觉。我的图纸机身看起来比实际飞机要厚。
中岛制造的战斗机的驾驶舱内部颜色在 NMF 飞机上是灰绿色(交付后在 NMF 上涂成深绿色迷彩)。在生产线上采用 7 号黄绿色迷彩后,驾驶舱也被涂成同样的 7 号黄绿色(这种颜色类似于橄榄色)。根据 Gakken 出版的参考资料描述,这种中岛内部绿色可能与 Hayate 的螺旋桨颜色相同。 |
 The side wall and floor was painted in No 7 Yellow Green. This color was a mixture of Mr.Color #12 Olive Drab (1) and Dark Earth with 2:1. 侧墙和地板涂上了 7 号黄绿色。这种颜色由 Mr.Color #12 Olive Drab (1) 和 Dark Earth 以 2:1 混合而成。 |
 Additional colors of yellow and red were fiction. 此外,还虚构了黄色和红色。 |
|
机翼是按照我的图纸制作的。根弦缩短了 1 毫米(0.04 英寸)。翼尖弦没有缩短。翼尖末端向上弯曲了一点。套件没有冲洗功能。因此机翼部件在粘合时发生了扭曲。套件的翼面是正确的。翼尖厚度过大。 |
 Positions of start and end points of panel lines were marked through the scale drawings with a needle. 用针在比例尺图纸上标出面板线起点和终点的位置。 |
 The wing was glued, sanded and engraved. The wing tip edge was sanded to be sharp. 机翼经过粘合、打磨和雕刻。翼尖边缘被打磨得锋利。 |
 The wing was glued to the fuselage. 机翼被粘在机身上。 |
 The engine and intake vane were glued. 发动机和进气叶片已粘合。 |
|
|
 The wood mold was made of chemical wood. 木模是用化学木材制成的。 |
 At first, the mold was made in a correct outline shape. |
 Then the mold was sanded by the thickness of clear plastic. |
 Clear 0.4mm (.016") thick styrene sheet (Tamiya Pla-Plate) was heat formed. |
|
|
 Curved panel lines were engraved with custom made templates cut with home-use cutting machine. |
 The center four exhaust stacks were from kit. The upper and lower exhausts were scruch-built. |
 I didn't satisfy with the shape of canopy. Then the wood mold was revised and heat formed again and again. |
 The rear fixed canopy would be formed with the same wood mold. |
 The kit spinner was not correct. So it was turned with a hand router. |
 1.5mm brass rod was used for the propeller axis. The gear housing was from the kit. |
 |
 The total image appeared. |
|
|
 The pilot seat was made of 0.3mm (.01") plastic sheet. The left is True Details' resin seat. |
 The colors of the seat and harness were assumption. The grip of control stick was made of wood in the actual aircraft. |
|
 The landing light was made of clear sprue which was drilled in the back side. Then punched out aluminum sheet was glued in the hole with clear paint. |
 The side and rear surfaces of clear sprue were painted dark gray. |
|
 Mr. Surfacer 1200 was thinly sprayed. It revealed defects of the model surface. Then these defects were patiently fixed up. |
 Details were added. |
|
|
 Frames were engraved. The rear fixed canopy was from kit. |
 The wind screen and fix canopy were glued. The inside surface of them were polished. |
|
 Then outside was polished as well. |
 The slide rail was made of plastic sheet (white). |
|
|
 Details were added. |
 |
 Fasteners were engraved with beading tools. The top frame of the canopy was engraved with handmade double needles with guides of tape. |
 Surfacer was sprayed again. Then defects appeared, they were fixed up, and so on. |
|
 Rib tapes were custom made dry decals. |
 The width of the rib was 0.2mm (.008"). |
|
|
 The propeller blade was from Tamiya Mosquito. Scale drawings was cut and pasted. |
 The right is corrected blade (of course, one more blade is prepared). The left is Hasegawa original. |
|
 Propeller blades were glued on the spinner. |
|
|
|
|
|
 Each color shade and the total balance were checked with a waste model. FAA Seafire was simultaneously on going. |
 Masking tape was cut on the print out of illustration data. |
|
 GX1 Cool White was sprayed on surfacer and masked for next red painting. |
 Red was sprayed and masking tape was removed. |
|
 The white fringe of insignia was masked. |
 Fabric control surfaces were masked as well. Then orange yellow was painted. |
|
 The identification band and walkway were masked. |
 #8 Silver was sprayed. |
|
 The antiglare and step was painted in dark gray (70% black + 30% white) and masked. Then Silicon Barrier was sprayed over the upper surface and Light Gray Green was sprayed on the lower surface. |
 No 7 Yellow Green was finished. Weathered effects were applied a little with an airbrush. |
|
 Basic painting works were finished. I felt that Red should be darker. |
 Blu Tack was filled in the gear bay. |
|
|
 Scratching was applied. Then Flat Clear was sprayed and polished with Mr. Laplos #6000. Weathering wash was Tamiya Weathering Master with soapy water. |
 Scratching paint on the starboard side was correctly applied as possible as original photo. |
|
 Scratching paint on the wing was applied along rivet lines. I imaged footsteps of maintenance crews. Dark shadows were applied over scratching. |
 Small cautions were custom made dry decals. |
|
 Aircraft number 46 was dry decals. Ribs were depicted with dry decals. |
 The propeller was painted in Gray Green. I painted in original mixture of FAA Dark Slate Gray (40% #340 Field Green, 45% #333EDSG, 5% #26 Duck Egg Green, 10% GX1 White). Yellow cautions were dry decals. |
|
|
 The kit gear cover was enlarged. |
 The front edge of the cover was "L" shape. Plastic sheet was glued for the L shape edge. |
|
 The wheel cover was made of 0.2mm (.008") plastic sheet. |
 The kit gear leg was thinned. The torque link was made of 0.5mm (.02") plastic sheet. It was engraved with carving knifes. |
|
 The oleo strut was Hasegawa Mirror Finish. The tire of this photo is upside down. |
|
|
 I had mistaken the tank cap. It was filled with Tamiya Putty. |
 Then the cap and circumference were painted with a fine brush. These correcting works became difficutl by Silicon Barrier. That was unexpected. |
|
 The seat and control stick were glued. The antenna mast was made of brass rod. |
 The landing gear was glued. The tail gear was from the kit. |
|
|
 The wing gun was made of 0.8mm (.03") brass pipe. The flexible chuck was set on the universal chuck. |
 The wing gun was turned as its complex shape. |
|
 The pitot tube was 0.6mm (.02") nickel silver rod. This was turned as well. |
 Weathering with Tamiya Weathering Master was added more. |
|
Small amount of dry (without water) Tamiya Weathering Master was rubbed on the model along rivet lines with a dry fine brush. |
 The gun sight was made of some pieces of plastic. The base was 1mm (.04") thick plastic plate. |
 The actuate link of the wheel cover was made of plastic sheet and extended sprue. |
|
 The drop tank braces were made of kit drop tank. |
 These small screws were made of two sizes of extended sprue. 0.5mm (.02") dia rod was sliced. Then 0.2mm .008") dia rod was glued with thin liquid cement. |
|
|
 |
 |
|
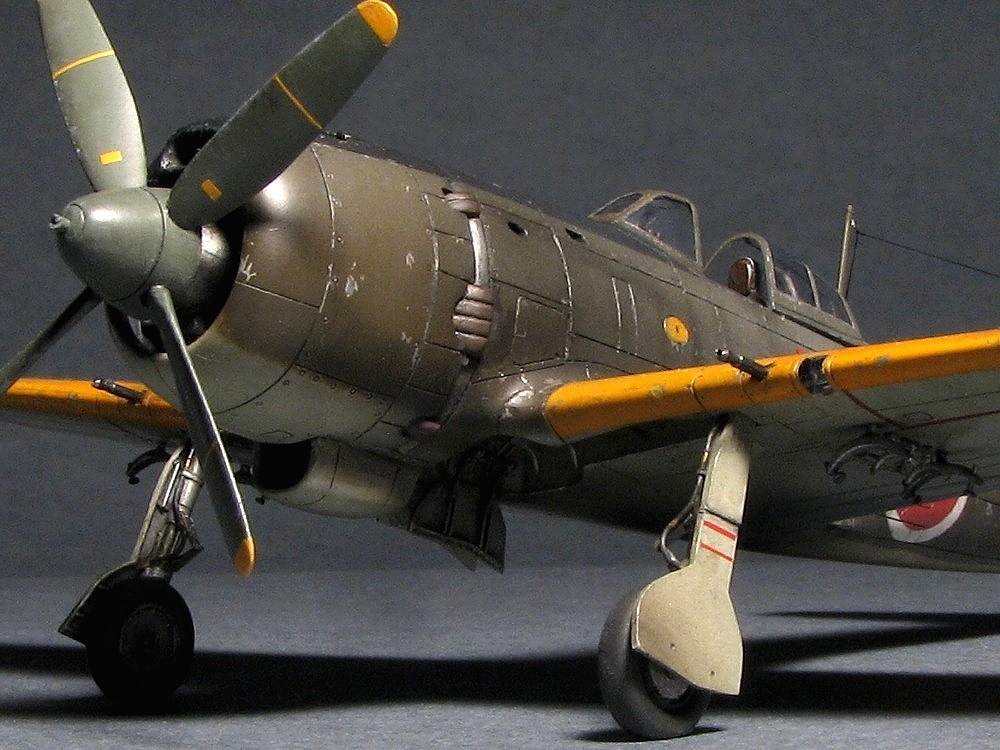
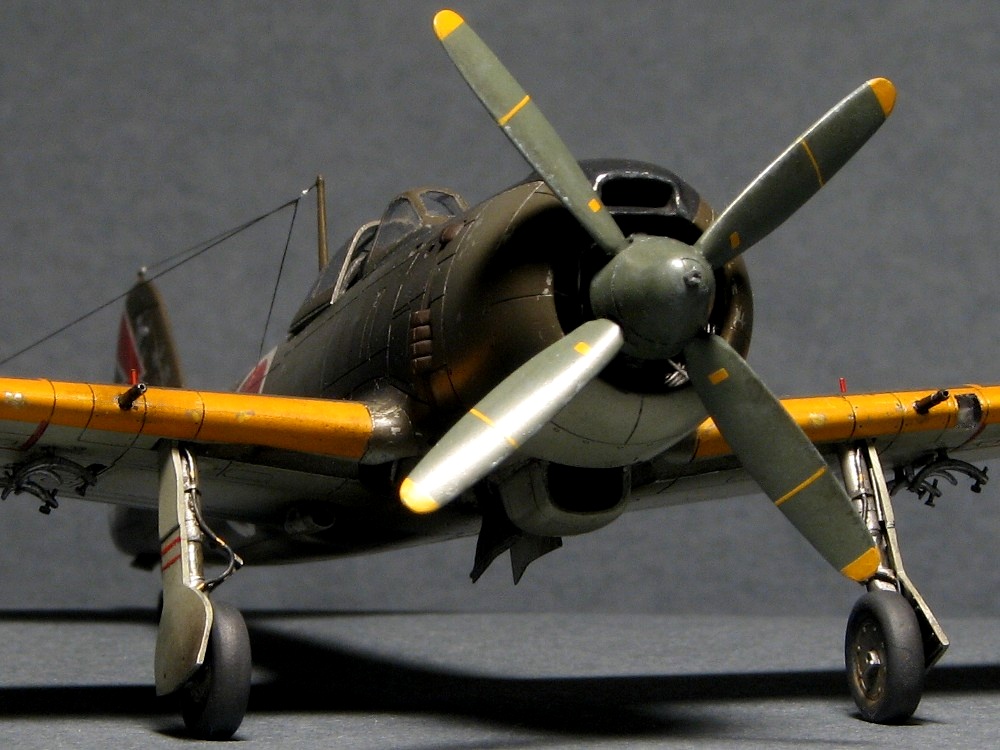
After a few weeks, I took authentic photos with background gray paper. The first photo was taken from 20cm (8 inches) apart. So this distance is alike many of WW2 original photos. What do you think about the image of my Hayate seen at the same angle as original WW2 photos? Please take note the presence of the engine cowl and the slim fuselage upper half. |
|
|
 |
 |
 |
 |
 |
|
|

|
|
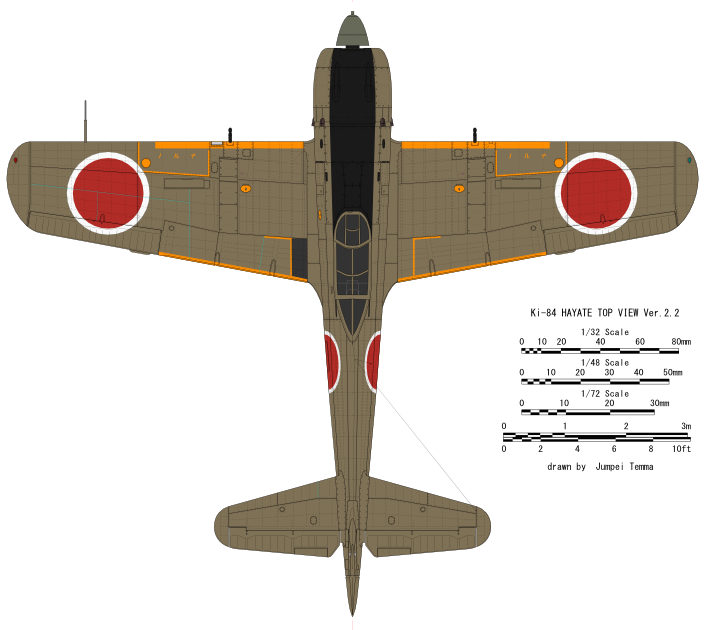
The 11th Hikou-Sentai serial number 1146, Philippines, late 1944. The aircraft became the only existing Hayate of Chiran Museum. The original photo shows its starboard side. So the port side is assumption. The unit marking was made a design of 11. The shade of No 7 Yellow Green looked like olive drab or dark brown in fresh. It became grayish brown in a process of fading. Finally, it became slightly purplish light gray. I think the first illustration of 47 Sentai was in fresh condition and the second one was in faded condition. |

|
|
Dark Green and No 7 Yellow Green were not easy to distinguish in monochrome photos. They were generally distinguished by a comparison with hinomaru red. The former looks dark and the latter looks light. But there might be exceptions. Then I converted to mono tone. |

|

|
|
The early production model of serial 491, flown by 2nd Lt. Hiroshi Shimizu of the 73rd Sentai, Tokorozawa Saitama Pref, Nov. 1944. The 73rd Sentai moved to Philippines in December. This aircraft was manufactured in July 1944. The top rudder chord is long and its trailing edge is squarish. The drop tank rack was located on the center of fuselage. The cockpit was painted in gray green. The aircraft number 91 might be black. |

|
|
Otsu model of the 104 Sentai, Manchuria, spring to summer of 1945. The oil cooler was enlarged. Late production model was to be painted in No 7 yellow green. But according to the urgent demand from front line units, some of them were delivered without camouflage. Detail colors - fuel cap panel, antenna mast etc. - were assumption. The area of the antiglare paint was small. The cockpit might be painted in No 7 Yellow Green. |

|
|
Early production model of the 1st training squadron in Nakatsu air base, Kanagawa, 1944. |

|
|
The increasing prototype of Akeno Army Flying School. The camouflage pattern of its later fuselage half was assumption. The aircraft number might be painted on the tail fin, but it was unknown. |

|
|
The last one is very rare camouflaged Hayate. The 3rd squadron of the 102 Sentai in Kyushu. A piece of rudder fabric painted in dark blue is preserved in Kawaguchiko ZeroFighter Museum. Other portion of this illustration is assumption including the production type. |

|
|
|