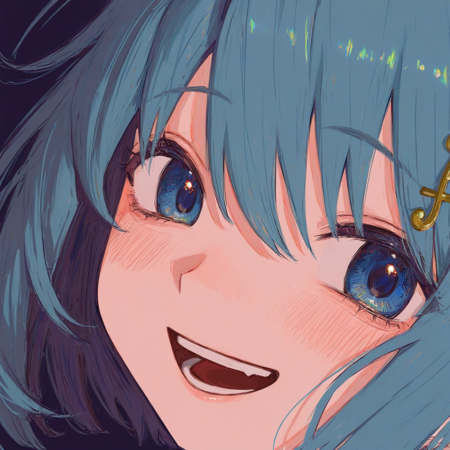
Have you tried generating images with the new NoobAI vpred model, only to fail miserably? That’s exactly what happened to me. While this model boasts incredible knowledge and adheres to prompts better than any SDXL anime model I’ve tried, the results were just ugly and inconsistent.
你是否尝试过用新的 NoobAI vpred 模型生成图像,结果却惨败?我就是这样。虽然这个模型拥有令人难以置信的知识,并且比我试过的任何 SDXL 动漫模型都更能遵循提示,但结果却很丑陋且不一致。
That’s why I started experimenting with different settings to make it work, and I’ve finally reached a stage where I’m reasonably satisfied with the results. Now I want to share my smdb NoobAI - vpred workflow with everyone.
这就是为什么我开始试验不同的设置来使其正常工作,并且我终于达到了一个阶段,对结果还算满意。现在我想和大家分享我的 smdb NoobAI - vpred 工作流程。
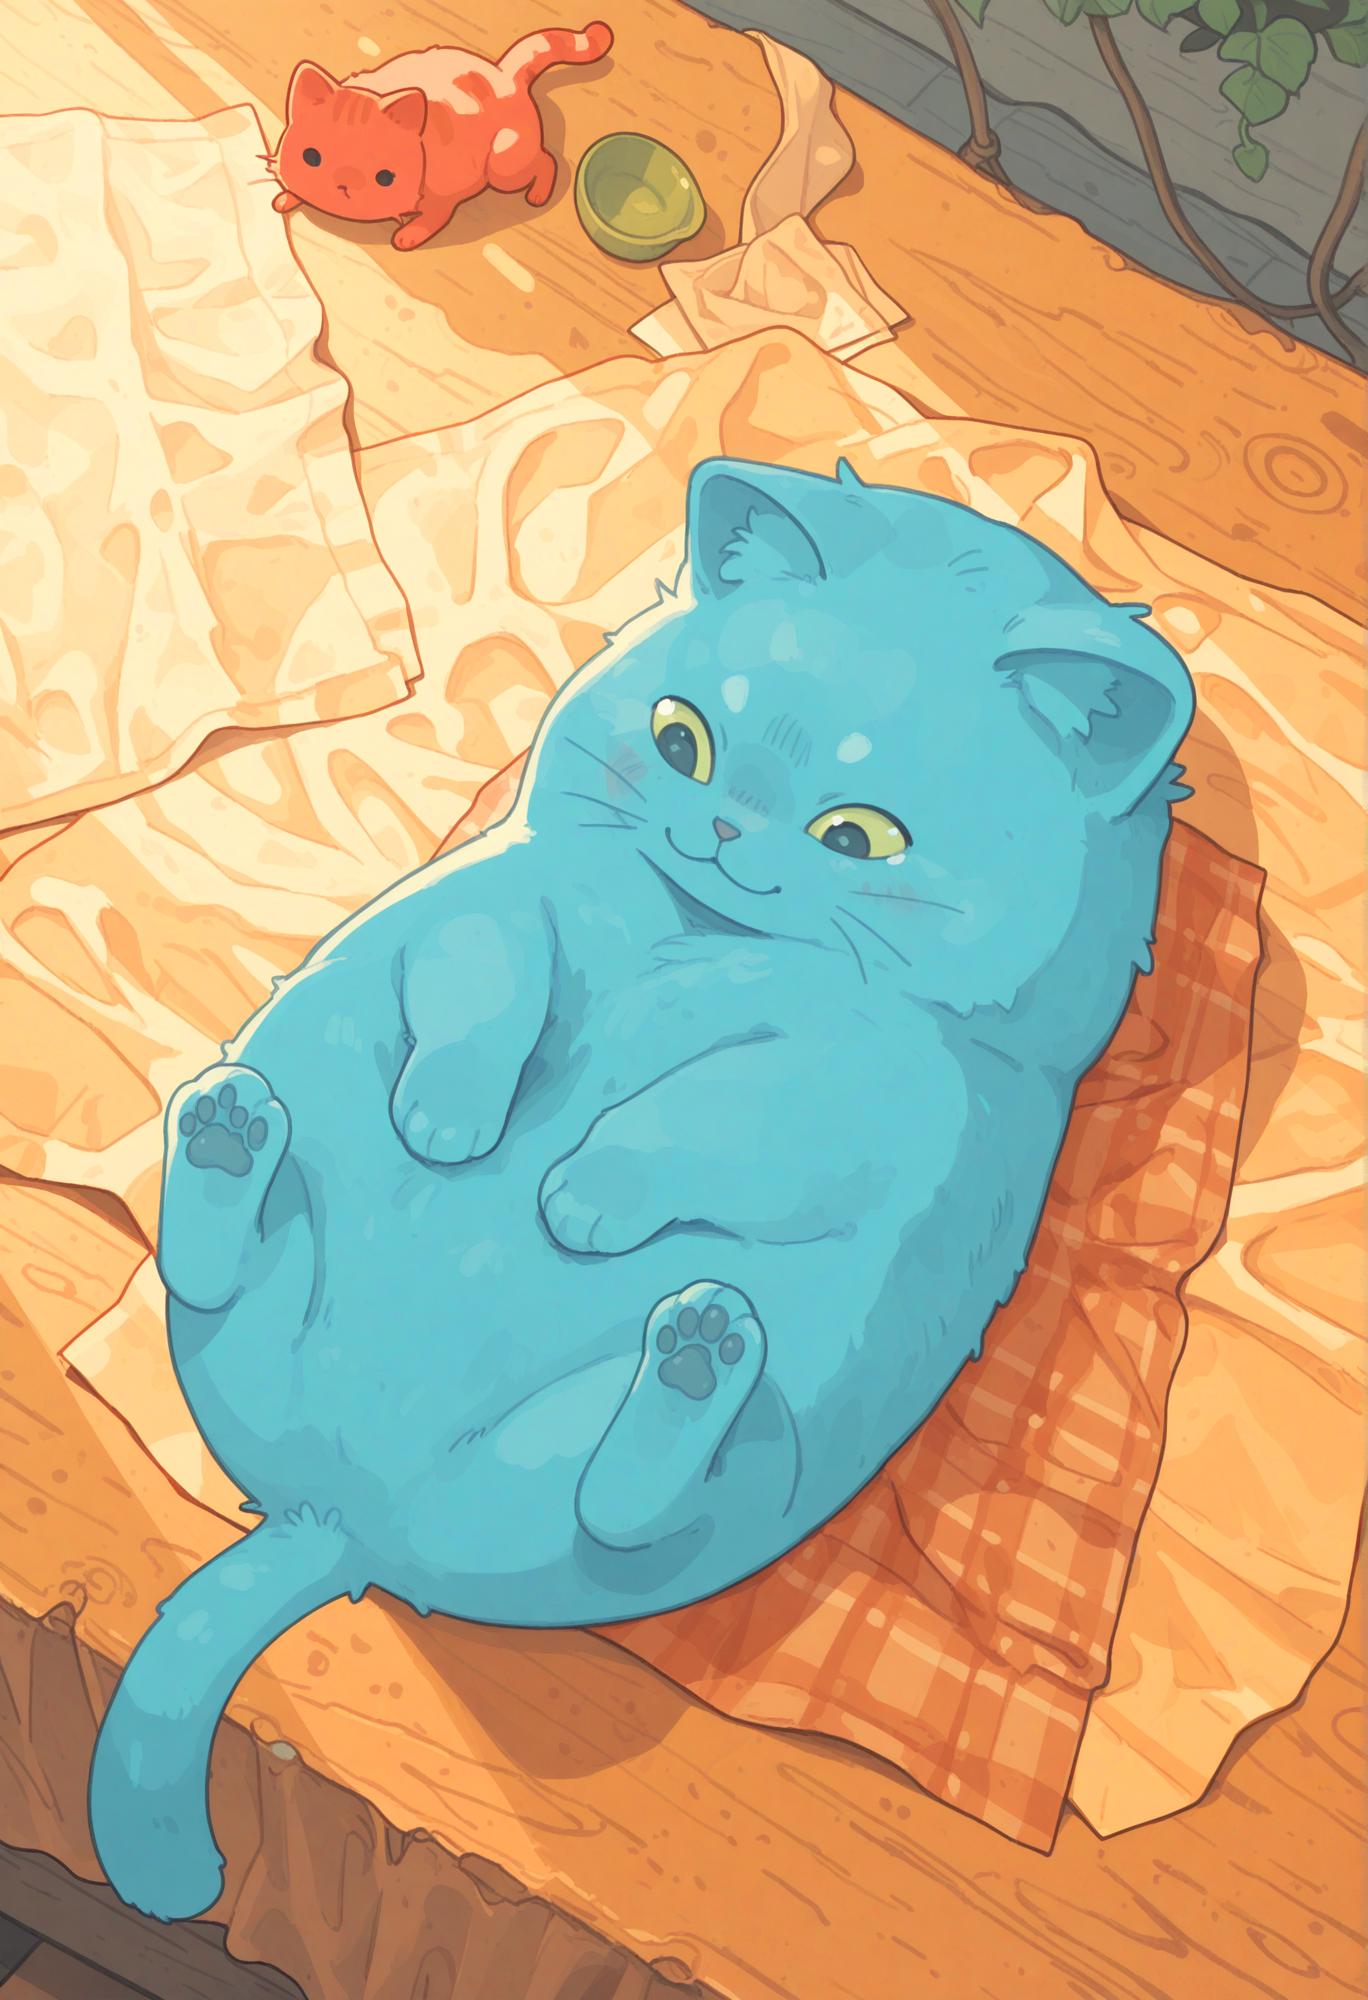
On the workflow page you’ll find examples of what the base NoobAI model can achieve without using any LoRAs. I’m still amazed by this model’s capabilities every day, and I hope you’ll enjoy exploring it as much as I do.
在工作流程页面上,你会找到基础 NoobAI 模型在不使用任何 LoRA 的情况下所能实现的示例。我每天仍然对这个模型的能力感到惊讶,希望你能像我一样享受探索它的过程。
Of course any suggestions to further improve the workflow are more than welcomed.
当然,任何关于进一步改进工作流程的建议都非常欢迎。
Features 功能
Flexible. Base NoobAI vpred model is used for maximum characters and artists knowledge, LoRA compatibility, composition and styles diversity. You can generate anything from flat-colors 2D art to semi-realistic 2.5D.
灵活。基础 NoobAI vpred 模型用于最大限度地利用角色和艺术家知识、LoRA 兼容性、构图和风格多样性。你可以生成从平面色彩 2D 艺术到半写实 2.5D 的任何内容。LoRAs can be applied directly from the prompt with Automatic 1111 syntax
<lora:lora-name:weight>.
LoRAs 可以使用 Automatic 1111 语法<lora:lora-name:weight>直接从提示词中应用。Most of the other Automatic 1111 syntax is also supported, see below for more info.
大多数其他 Automatic 1111 语法也受支持,更多信息见下文。Prompt wildcards support.
提示通配符支持。Fast. 1368x2000 image is generated in about 40 seconds on weak RTX 3060.
速度快。在性能较弱的 RTX 3060 上,生成 1368x2000 的图像大约需要 40 秒。Relatively simple. You should be able to generate good images with default settings.
相对简单。你应该能够使用默认设置生成不错的图像。Reduces jpeg and gradient artifacts.
减少 JPEG 和渐变伪影。Optional image post-processing. No more yellow tint, dark images, washed colors etc.
可选的图像后处理。不再有黄色色调、暗图像、褪色颜色等问题。Ability to tweak desired level of details without LoRAs.
无需 LoRAs 即可调整所需细节级别的能力。You can save images with a1111 metadata embedded compatible with Civitai.
你可以保存嵌入了与 Civitai 兼容的 a1111 元数据的图像。
Installation 安装
Install or update to latest versions of ComfyUI and ComfyUI Manager. There are a lot of guides and videos how to do this.
安装或更新到 ComfyUI 和 ComfyUI Manager 的最新版本。有很多关于如何做到这一点的指南和视频。Load workflow from JSON file or sample image, open Manager and click "Install Missing Custom Nodes". Install every missing node, select "nighty" if asked for node version.
从 JSON 文件或示例图像加载工作流程,打开管理器并点击“安装缺失的自定义节点”。安装每个缺失的节点,如果询问节点版本则选择“nighty”。If you encounter error about First Block Cache node search for WaveSpeed in the Comfy Manager or install this node manually.
如果你在 Comfy Manager 中遇到关于 First Block Cache 节点的错误,请搜索 WaveSpeed,或者手动安装此节点。Another useful extension is ComfyUI Custom Scripts. It provides tags and LoRAs prompt autocomplete.
另一个有用的扩展是 ComfyUI 自定义脚本。它提供标签和 LoRAs 提示自动完成功能。Enable "Reroutes Beta" feature in Settings -> Lite graph.
在设置 -> 精简图中启用“重路由测试版”功能。
Resources 资源
Base model 基础模型
I am using vanilla NoobAI vpred 1.0 as a base model for maximum flexibility. Of course nothing stops you from using another models if you wish, even base Illustrious. Put this model into models/checkpoints directory.
我正在使用香草版 NoobAI vpred 1.0 作为基础模型,以获得最大的灵活性。当然,如果你愿意,也可以使用其他模型,甚至是基础版 Illustrious。将此模型放入 models/checkpoints 目录中。
Refiner model 细化模型
There are tons of options here, you basically can use and Illustrious model. I will mention a few I have tried and liked.
这里有大量的选项,你基本上可以使用 Illustrious 模型。我会提及一些我试过且喜欢的。
Noobai-Cyberfix-V2 (vpred) should be very close to base NoobAI but have improved anatomy. Tends to give darker images. Adjust with Color Correction gamma and contrast if needed. I like to use it as upscaler model.
Noobai-Cyberfix-V2(vpred)应该与基础 NoobAI 非常接近,但解剖结构有所改进。往往会生成较暗的图像。如有需要,可通过色彩校正伽马值和对比度进行调整。我喜欢将其用作放大模型。Falafel MIX seems to have some bits of WAI model that I know little about, looks like another descendant of Illustrious. Anyway this model is good with backgrounds and don't change original artists styles much. There is also cyberfix variant that is even better with anatomy but artist styles are weaker and looks more AI generic.
法拉费混合模型似乎包含一些我不太了解的 WAI 模型元素,看起来像是 Illustrious 的另一个衍生模型。不管怎样,这个模型在处理背景方面表现出色,并且不会过多改变原艺术家的风格。还有一个网络修复变体,在人体结构方面表现更好,但艺术家风格较弱,看起来更具 AI 通用性。Vixon's Noob Illust Merge is all round good universal model. It is one of the few merge models that can tolerate "non-anime" faces and renders NoobAI artist styles pretty close. I also like that it almost never adds random details. Result images may look a bit washed out, user Color Correction panel to boost saturation.
Vixon 的新手插画融合模型是一个全面优秀的通用模型。它是少数能够容忍“非动漫”面孔的融合模型之一,并且能很好地呈现 NoobAI 艺术家风格。我还喜欢它几乎从不添加随机细节这一点。生成的图像可能看起来有点暗淡,可以使用色彩校正面板来提高饱和度。KNK NoobiComp is great if you want to keep original artist styles intact. It is one of the strongest models in this regard.
如果你想保持原艺术家风格不变,KNK NoobiComp 很棒。在这方面,它是最强的模型之一。ZUKI cute ILL is great for 2D art. Slightly overrides styles and changes characters faces to more "anime-like". Also adds a lot of details.
ZUKI cute ILL 非常适合二维艺术。它会稍微覆盖一些风格,并将角色的脸变得更“动漫化”。同时还会添加很多细节。For stronger semi-realism you can use something like Rillusm or CyberIllustrious - CyberRealistic but I don't have much experience with them.
为了获得更强的半写实效果,你可以使用诸如 Rillusm 或 CyberIllustrious - CyberRealistic 之类的东西,但我对它们没有太多经验。
Put these models into models/checkpoints directory.
将这些模型放入 models/checkpoints 目录中。
Pixel upscaler model 像素放大模型
Put 4x-NomosUni_span_multijpg fast upscaler model into the models/upscale_models directory.
将 4x-NomosUni_span_multijpg 快速图像放大模型放入 models/upscale_models 目录中。
Prompt wildcards 提示通配符
If you want to use prompt wildcards put them into the wildcards directory.
如果你想使用提示通配符,请将它们放入 wildcards 目录中。
Workflow settings explained
工作流程设置说明
Models 模型
Keyboard hotkey (1) 键盘快捷键(1)
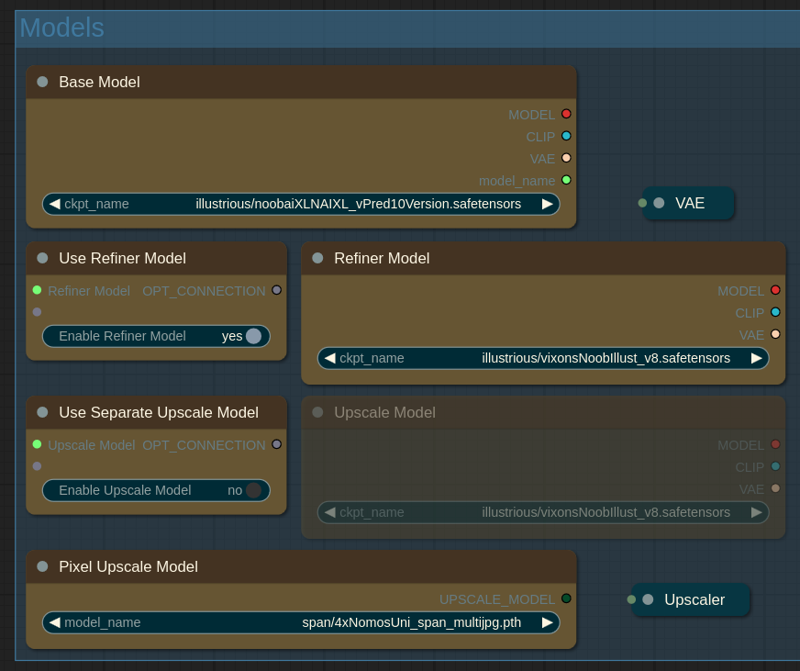 In this panel you can choose all the models.
在这个面板中,你可以选择所有的模型。
Base Model: this model is used for initial generation and largely determines final image composition, tags knowledge, styling and prompt adherence. I use NoobAI vpred.
基础模型:此模型用于初始生成,并在很大程度上决定最终图像的构图、标签知识、风格和对提示的遵循程度。我使用的是 NoobAI vpred。Use Refiner Model / Refiner Model: enable if you want to use refiner model. Refiner model finishes last steps of initial generation. It can help with aesthetics, anatomy and remedy some of the quirks of the base vpred model.
使用精炼模型 / 精炼模型:如果您想使用精炼模型,请启用。精炼模型完成初始生成的最后步骤。它可以帮助提升美感、优化解剖结构,并纠正基础 vpred 模型的一些问题。Use Separate Upscale model: enable if you want to use third model for upscaling stage or if you don't use refiner. Otherwise refiner model is used.
使用单独的放大模型:如果您想在放大阶段使用第三个模型,或者如果您不使用细化器,请启用此选项。否则将使用细化器模型。Pixel Upscale Model: model to do pixel upscale stage.
像素放大模型:用于执行像素放大阶段的模型。(advanced) Fallback Upscale Model: what model to use if upscale model is not selected. 1 - base model, 2 - refiner model (default). You most likely don't need to touch this setting.
(高级)备用放大模型:如果未选择放大模型,则使用什么模型。1 - 基础模型,2 - 细化模型(默认)。你很可能不需要更改此设置。
Prompt 提示
Keyboard hotkey (2) 键盘快捷键 (2)
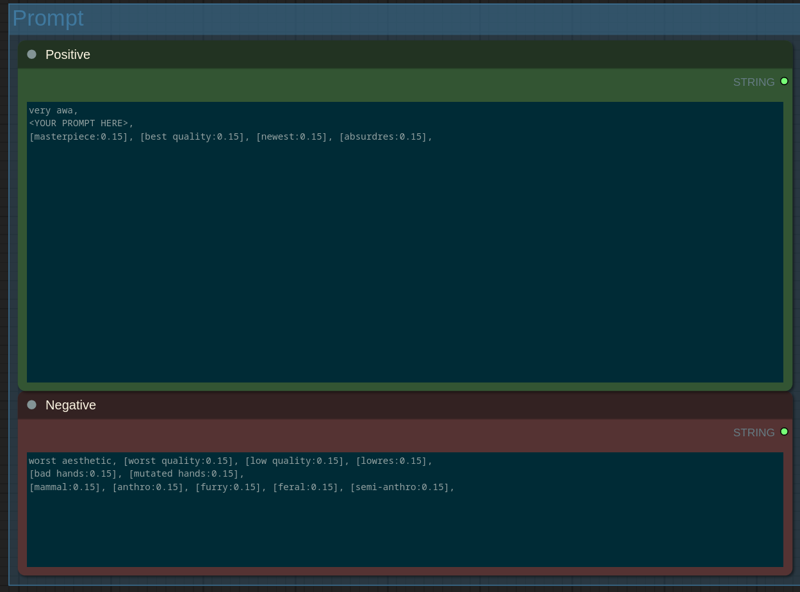 On this panel you enter your prompt.
在这个面板上,你输入你的提示词。
Type your prompt after
very awa(not a typo).
在very awa之后输入你的提示(不是拼写错误)。Use Danbooru and e621 tags exactly as you find them on corresponding wikis.
按照你在相应维基上找到的方式准确使用 Danbooru 和 e621 标签。Most of the Automatic 1111 advanced syntax is supported. You can apply LoRAs with
<lora:lora-name:weight>, useBREAKandANDkeywords, schedule tags etc. See syntax guide if needed.
支持大部分 Automatic 1111 的高级语法。你可以使用<lora:lora-name:weight>应用 LoRAs,使用BREAK和AND关键词、调度标签等。如有需要,请参阅语法指南。Default positives and negatives I have included in the workflow give me good results while keeping the results flexible.
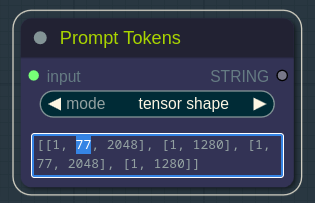
我在工作流程中包含的默认正向和负向提示词在保持结果灵活性的同时,给了我很好的效果。SDXL models demonstrate best prompt adherence if prompt length is not longer than 75 (77) tokens. You can check current positive prompt length in the Prompt Tokens node after queening the generation.
如果提示长度不超过 75(77)个词元,SDXL 模型能展现出最佳的提示遵循效果。在生成任务排队后,你可以在“提示词元”节点中查看当前正向提示的长度。
 Prompt wildcards support 提示通配符支持
Put wildcard files into the wildcards directory inside ComfyUI path. Than you can insert them into the prompt with this syntax __wildcard-directory/wildcard-file__. If you want to learn more about using wildcards, check the Mikey Nodes documentation.
将通配符文件放入 ComfyUI 路径下的 wildcards 目录中。然后你可以使用此语法 __wildcard-directory/wildcard-file __将它们插入到提示中。如果你想了解更多关于使用通配符的信息,请查看 Mikey Nodes 文档。
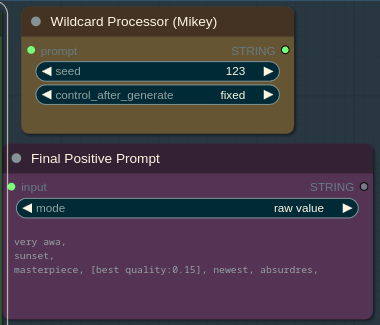 Seed in the Wildcard Processor node determines what line will be chosen from the wildcard file(s).
通配符处理器节点中的种子决定了将从通配符文件中选择哪一行。
You can see final prompt after wildcards substitution in the Final Positive Prompt node.
你可以在“最终正向提示”节点中看到通配符替换后的最终提示。
txt2img settings 文本到图像设置
Keyboard hotkey (3) 键盘快捷键 (3)
On this panel you can change txt2img generation settings.
在这个面板上,你可以更改文本到图像的生成设置。
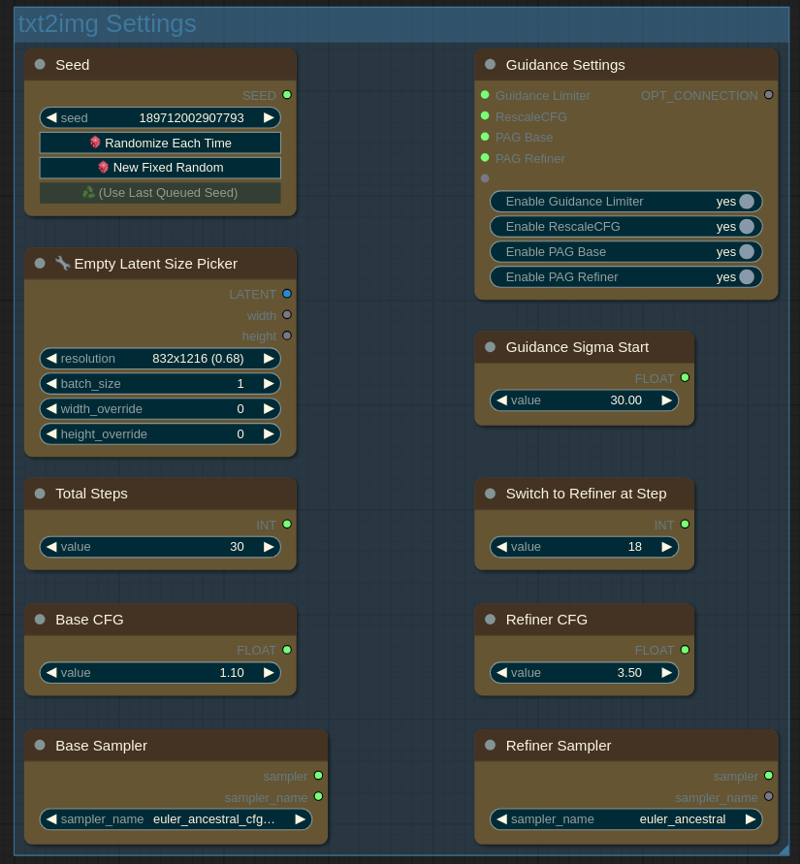
Seed: same as Automatic 1111. You can randomize seed each time, use fixed seed or reuse seed from last generation.
种子:与 Automatic 1111 相同。你可以每次随机化种子,使用固定种子或重复使用上一代的种子。Empty Latent Size: size of initial image. Start with batch size 1 for max quality, see "known issues" below.
空潜在大小:初始图像的大小。为获得最高质量,请从批量大小 1 开始,参见下面的“已知问题”。Total Steps: total number of steps = base + refiner.
总步数:总步数 = 基础步数 + 细化步数。Switch to Refiner at Step: when to switch to the refiner model. The lower this number is the more influence will have refiner over the base model. Sweet spot is usually 18...24.
在步骤时切换到精炼器:何时切换到精炼器模型。这个数字越低,精炼器对基础模型的影响就越大。最佳点通常是 18...24。(advanced) Base CFG: CFG value for the base model.
(高级)基础 CFG:基础模型的 CFG 值。(advanced) Refiner CFG: CFG value for the refiner model.
(高级)细化器 CFG:细化器模型的 CFG 值。(advanced) Base Sampler: sampler for the base model.
(高级)基础采样器:基础模型的采样器。(advanced) Refiner Sampler: sampler for the refiner model.
(高级)细化采样器:用于细化模型的采样器。(advanced) Adjust Details: increase or decrease desired level of image details. 0 is default (no changes). Usually works fine from -2 to 2.
(高级)调整细节:增加或减少所需的图像细节级别。0 为默认值(无变化)。通常在-2 到 2 之间效果良好。(advanced) Guidance Limiter: Limits CFG at low steps. This can improve image quality if first steps introduce nonsensical details.
(高级)引导限制器:在低步数时限制 CFG。如果初始步骤引入了无意义的细节,这可以提高图像质量。(advanced) Guidance Sigma Start: sigma at which Guidance Limiter (if enabled) should stop limiting.
(高级)引导西格玛起始值:启用引导限制器(如果启用)时,引导限制器应停止限制的西格玛值。(advanced) Enable RescaleCFG. In theory prevents image burning. From my experience it has little effect with CFG++ samplers but works nice with the normal ones. Can also improve hands and reduce limb mutations. Check what works best for you.
(高级)启用重新缩放 CFG。理论上可防止图像过曝。根据我的经验,它对 CFG++采样器效果甚微,但对普通采样器效果不错。还可以改善手部并减少肢体变异。检查哪种设置最适合你。(advanced) Enable PAG Base / Refiner. Perturbed-Attention Guidance is said to improve prompt adherence and image composition in the cost of generation time. Enabling it at base stage changes image composition drastically and burns colors a little. Enable for maximum prompt adherence or to generate bold contrast artworks.
(高级)启用 PAG 基础/细化器。据说扰动注意力引导可以提高对提示词的遵循度和图像构图,但会增加生成时间。在基础阶段启用它会极大地改变图像构图,并使颜色稍有偏差。启用此功能可实现最大程度的提示词遵循度,或生成具有强烈对比的艺术作品。
Some base model txt2img generation settings I have tested:
我测试过的一些基础模型文本到图像生成设置:
euler CFG++ / euler a CFG++ / CFG 1.0...1.5 / PAG ~0.5
欧拉 CFG++ / 欧拉 a CFG++ / CFG 1.0...1.5 / PAG ~0.5euler / euler a / CFG 3.0-5.5 / PAG 2.5...3.0
欧拉/欧拉 A/CFG 3.0 - 5.5/PAG 2.5...3.0
CFG++ samplers provide better prompt adherence especially with CFG 1.3...1.4, but resulting images can be too contrast. If you want lighter colors try normal euler or eualer a samplers.
CFG++采样器能提供更好的提示词遵循效果,尤其是在 CFG 1.3……1.4 的情况下,但生成的图像可能对比度太高。如果你想要颜色更浅的图像,可以尝试普通的欧拉或欧拉 A 采样器。
For refiner model these settings should work:
对于细化器模型,这些设置应该可行:
euler / euler a / CFG 3.0-5.0 / PAG 2.5...3.0
欧拉/欧拉 A/引导系数 3.0 - 5.0/采样步数 2.5...3.0
Euler a generates more details than euler.
欧拉 a 比欧拉生成的细节更多。
Upscale Settings 放大设置
Keyboard hotkey (4) 键盘快捷键(4)
 On this panel you can change upscale settings.
在这个面板上,你可以更改放大设置。
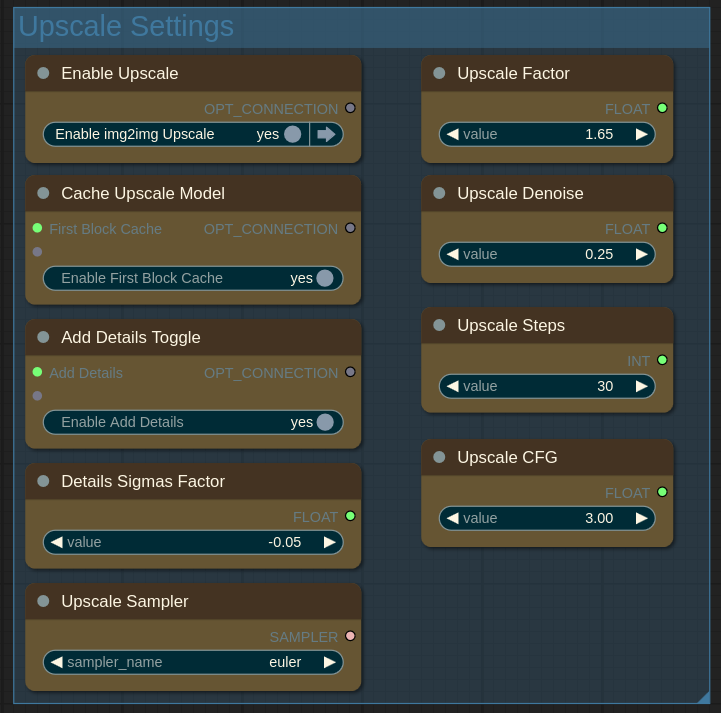
Enable Upscale: this upscale stage is similar to "HiRes Fix" in a1111. It is generally recommended to have it enabled. But you may wish to disable it for example to quickly search for good seed and then re-eanble to upscale just the images you like.
启用放大:此放大阶段类似于 a1111 中的“高分辨率修复”。通常建议启用它。但例如,你可能希望禁用它,以便快速搜索优质种子,然后重新启用,仅放大你喜欢的图像。Upscale Factor: larger factor will give you more details but you can't ramp it up indefinitely because the model will start to hallucinate.
放大因子:较大的因子会为你提供更多细节,但你不能无限制地提高它,因为模型会开始产生幻觉。Upscale Denoise: how much upscale model can change the initial image. Perhaps the most important setting on this panel. Larger values give upscaler more freedom to change image composition and style. Low and high values are both useful. For example if you see extra finger or strange limbs artifacts that are not present on the initial image you can increase denoise to give upscaler model chance to properly change the composition or lower it to stick with the initial one. Usual range is 0.25...0.65.
放大去噪:放大模型能在多大程度上改变初始图像。这可能是此面板上最重要的设置。较大的值会让放大模型有更多自由来改变图像的构图和风格。低值和高值都有用。例如,如果你在初始图像上没有看到的多余手指或奇怪肢体伪影出现,你可以增加去噪,让放大模型有机会正确改变构图,或者降低去噪以保持初始构图。通常范围是 0.25...0.65。Cache Upscale Model: use First Block Cache to speed-up upscaling. Disable if you see broken output after upscaling.
缓存放大模型:使用首个块缓存来加速放大。如果放大后看到输出损坏,请禁用。Add Details Toggle: if enabled Detail Daemon is used to add some extra details during upscaling.
添加细节切换:如果启用,细节守护程序将用于在放大过程中添加一些额外的细节。(advanced) Details Sigmas Factor: how much details to add if "Add Details" option is enabled. Larger negative numbers mean more details to add. Usual range is -0.01...-0.1. Positive numbers will reduce the details.
(高级)细节西格玛因子:如果启用了“添加细节”选项,要添加多少细节。更大的负数意味着要添加更多细节。通常范围是-0.01...-0.1。正数会减少细节。(advanced) Upscale Steps: number of upscale steps.
(高级)放大步骤:放大步骤的数量。(advanced) Upscale CFG: CFG for upscale stage.
(高级)放大 CFG:放大阶段的 CFG。(advanced) Upscale Sampler: sampler for the upscale stage.
(高级)放大采样器:用于放大阶段的采样器。
Output 输出
Keyboard hotkey (0) 键盘快捷键(0)
 On this panel you will see the final images and can do some Post-Processing.
在这个面板上,你将看到最终的图像,并可以进行一些后期处理。
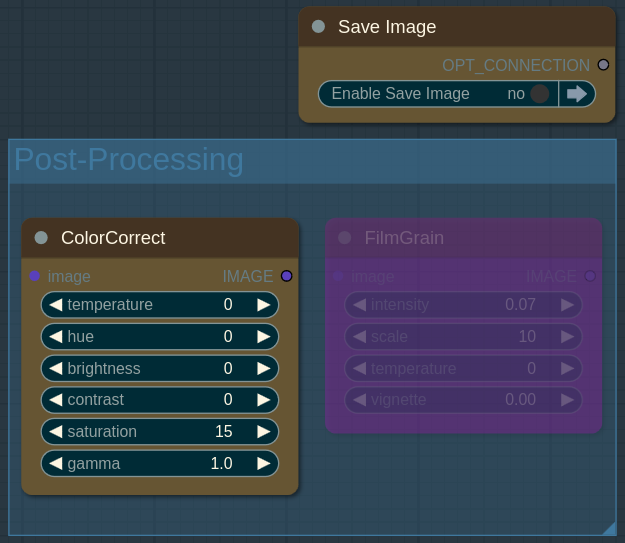
Save Image: if enabled upscaled images will be saved to
output/smdb-noobaidirectory. Images will have a1111 metadata embedded so you can upload them to Civitai with proper prompt and resources recognition.
保存图像:如果启用,放大后的图像将保存到output/smdb-noobai目录。图像将嵌入 a1111 元数据,因此你可以将它们上传到 Civitai,并能正确识别提示和资源。Color Correct: simple but very effective tool to improve resulting image quality. For example you can make colors more vivid with saturation, remove yellow tint of some artists with temperature etc. Reduce gamma to 0.9 if image has crushed blacks.
色彩校正:这是一个简单但非常有效的工具,可提高最终图像质量。例如,你可以通过饱和度使颜色更鲜艳,通过色温去除某些艺术家作品中的黄色调等。如果图像有暗部丢失的情况,将伽马值降低到 0.9。Film Grain: highly subjective, but I like a little bit of film grain for my 2.5D images. It gives them extra texture.
胶片颗粒:这是非常主观的,但我喜欢在我的 2.5D 图像中加入一点胶片颗粒。它能给图像增添额外的质感。
You can disable Color Correct or/and Film Grain nodes by right clicking and selecting "Bypass" or pressing Ctrl+B. Re-enable by pressing Ctrl+B again.
你可以通过右键单击并选择“绕过”或按 Ctrl+B 来禁用“色彩校正”或/和“胶片颗粒”节点。再次按 Ctrl+B 可重新启用。
Known issues 已知问题
For unknown reason batch size 2 generates worse quality images than batch size 1. I don't know if this is limitation of my 8Gb VRAM GPU but anyway try to start with batch size 1 and than compare the results with batch size 2.
出于未知原因,批量大小为 2 时生成的图像质量比批量大小为 1 时更差。我不知道这是否是我 8GB VRAM 显卡的限制,但无论如何,先从批量大小 1 开始,然后将结果与批量大小 2 进行比较。
I will be glad if you post your images on the workflow page. If you have any questions leave the comments below.
如果你能在工作流程页面上发布你的图片,我会很高兴。如果你有任何问题,请在下面留言。

This is an excellent workflow for noobaixl txt2img upscaled and I really enjoyed using it.
这是一个用于 NoobAI XL 文本到图像放大的出色工作流程,我真的很喜欢使用它。
Do you have any plans for making a controlnet/img2img/inpainting workflow or workflow recommendations?
你有制作 ControlNet/图像到图像/图像修复工作流程或工作流程建议的计划吗?
I don't have much experience with controlnets+illustrious/noob and haven't found much practical info online either. I want to experiment with ipadapter, "style transfer" is what I am interested mostly. If something useful comes out of it I will of course release the workflow.
我在 ControlNet+Illustrious/Noob 方面没有太多经验,在网上也没有找到太多实用信息。我想尝试一下 IP 适配器,我最感兴趣的是“风格迁移”。如果能从中得到有用的东西,我当然会发布工作流程。
you beter look at the Krita AI plugin V1.30.0 then. it include Noobai illustrious workflow and controlnet sorted out for us
那你最好看看 Krita AI 插件 V1.30.0。它为我们整理了 Noobai illustrious 工作流程和 ControlNet。