Kubernetes DevOps - Concepts
 Online
II - Kubernetes concepts
II - Kubernetes concepts
At a high level, Kubernetes works similarly to many cluster architectures. It consists of one or several masters (master) and several slave nodes, called Worker, which they control.
The Master nodes orchestrate the applications running on the Worker nodes and monitor them continuously to ensure that they match the desired state declared by the administrator.
A - Kubernetes components
As mentioned earlier, Kubernetes can be divided into Masters and Workers. There are also add-ons such as the Web user interface and the DNS that are provided as a service by Kubernetes offerings managed by Cloud providers (e.g. GKE, AKS, EKS).
a.1 - Master node components
Master components globally monitor the cluster and respond to cluster events. These can include scheduling, scaling or restarting an unhealthy Pod. Five components make up the master components: kube-apiserver, etcd, kube-scheduler, kube-controller-manager and cloud-controller-manager.
kube-apiserver: endpoint of the API REST to the server as an interface for the Kubernetes control plane.
etcd: shop of key values for cluster data (considered the single source of truth).
kube-scheduler: monitors new workloads (Pods) and assigns them to a node based on several scheduling factors (resource constraints, anti-affinity rules, data locality, etc.).
kube-controller-manager: central controller that monitors the node, the replication set, the termination points (services) and the service accounts.
cloud-controller-manager: interacts with the underlying cloud provider.
a.2 - Worker node components
In contrast to master node components, which generally run on a single master (unless we are setting up a high-availability configuration), worker node components run on all worker nodes:
kubelet: this is the agent running on the worker node to inspect the health of the containers and report back to the masters, it is also responsible for listening for new commands from the
kube-apiserverand applying them on the node it is installed on.kube-proxy: this is the component responsible for managing network traffic.
container runtime: this is the layer that allows containers (Docker, rkt, runc) to be run.

Kubernetes High Availability (HA for High Availability) involves configuring Kubernetes, and its components, so that there is no single point of failure (SPOF).
A single master can easily be in an error state, whereas a multi-master cluster uses multiple master nodes, each with access to the same information about the cluster.
In a single-master cluster, important components such as the Kube Api Server, controller manager, ETCD, are only on the single master node and if it is in error, we will no longer have a working Kubernetes cluster.
However, in the case of the Kubernetes HA environment, these critical components are replicated across multiple masters (typically three masters) and if one master goes down, the other masters keep the cluster operational.
B - Installation
We will be using an extremely lightweight version of kubernetes called k3s in this course. K3s is a Kubernetes distribution developed by Rancher.
As a lightweight version of Kubernetes, K3s consumes less resources than traditional distributions, allowing it to run well on small individual machines such as portables or desktops. K3s is also easier than other Kubernetes distributions to configure and manage in many ways.
That said, K3s isn't just for testing and experimentation. It can also serve as a production-ready Kubernetes distribution that can scale to run on large networks of devices. Rancher is promoting K3s as a Kubernetes option for IoT and edge infrastructures due to its low resource requirements, as well as its support for ARM64 and ARMv7 devices.
We can install everything with the following command:
curl -sfL https://get.k3s.io | sh -s - --write-kubeconfig-mode 644
We can now check the Kubernetes installation:
kubectl version
Output display:
Flag --short has been deprecated, and will be removed in the future. The --short output will become the default.
Client Version: v1.25.4+k3s1
Kustomize Version: v4.5.7
Server Version: v1.25.4+k3s1
We can notice that we have the kubernetes version : Server Version: v1.25.4+k3s1 , the version of the Kubectl client: Client Version: v1.25.4+k3s1. We will talk about Kustomize in the rest of this course.
K3s provides us with a node on which we have all the components of a cluster, it's an "all in one" installation on which we have a master and worker in a single instance.
To perform this check, we can run the following command:
k3s kubectl get nodes
C - Kubernetes object management model
Before jumping into Kubernetes workloads (Pods, controllers, etc.), it's important to understand the declarative model of Kubernetes.

Essentially, when we write YAML or JSON files, we describe the desired state of the application: which Docker image to run, which scaling strategy to use and which ports/services to expose? This information is published to the kube-api server and the master node distributes the work to ensure the cluster matches the desired state.
This configuration is stored in etcd and the workload is deployed to the cluster. Finally, Kubernetes will continuously check whether the current state of the cluster matches the behaviour defined by the administrator. So, if one Pod is down, Kubernetes will launch another.
While this all sounds simple, it's a powerful scheme that makes Kubernetes very useful. It will therefore regularly check the current state of the cluster and implement the various actions so that the desired state equals the desired state. This is called the kubernetes check loop or kubernetes watch loop.
D - Kubernetes workloads
Kubernetes workloads are divided into two main components: the Pods and Controllers (ReplicaSet, Deployment, StatefulSet, CronJob, etc.).
d.1 - Pods
A Pod for Kubernetes is what a container is for Docker: the smallest and simplest unit of its object model. It's useful to conceptualize Pods as a single instance of an application or container. In reality, a Pod encapsulates one or more containers as well as storage resources, an IP address and rules on how the container(s) should operate.

Because Pods are an atomic unit (atomicity refers to an operation of a program that executes entirely without being able to be interrupted before the end of the run) in Kubernetes, each Pod must actually run a single instance of a given application. So if we need to run multiple containers, each container must run in its own unique Pod instead of having all those containers in a single Pod.
However, sometimes a multi-container Pod makes sense if they are closely related (a common example is a logging component). One key thing to note is that all containers in a Pod will share the same environment: memory, volumes, network stack and, most importantly, the IP address.
In a typical deployment, Pods are not directly created by the scheduler. Instead, the controller will schedule a Pod to run on a node.
The scheduler will create the Pod.
Some important things to know about Pods:
A Pod can only exist on a single node.
A Pod can never be in a partially deployed state. If any part of the Pod never appears, it is considered defective and fails.
A Pod is not repaired, but rather treated as a discardable component. In other words, if a Pod becomes compromised, the controller components will destroy the failed unit and start another Pod. A Pod will therefore be replaced and not repaired.
What is a Pod used for?
Pods represent the processes running on a cluster. By limiting Pods to a single process, Kubernetes can report on the health of each process running in the cluster.
Pods have:
a unique IP address (which allows them to communicate with each other)
one or more volumes of persistent storage (as required)
configuration information that determines how a container should run.
While most Pods contain a single container, many will have a few containers that work closely together to perform a desired function.
Functioning
Pods are created by workload resources called controllers, which manage the deployment, replication and health of Pods in the cluster. If a node in the cluster fails, a controller detects that the Pods on that node are not responding and the Kube Api Server creates replacement Pods on other nodes in the cluster.
The three most common types of controller are:
Jobs for batch tasks that are ephemeral and will run a task until it is completed.
Deployments for stateless and persistent applications, such as web servers.
StatefulSets for persistent stateful applications (for example, that manage data persistence) such as databases.
If a Pod has multiple containers, they are all scheduled together on the same server in the cluster, whether this is a virtual machine or a physical server. All containers in the Pod share resources and dependencies and can coordinate their execution and termination.
For example, Pods can contain init containers that run before application containers run, configuring the environment for applications that follow.
Pods are almost always created by controllers, which can then automatically manage the Pod lifecycle, including replacing failed Pods, replicating Pods if necessary and evicting the Pod from cluster nodes when they are finished or no longer needed.
Controllers use information from a Pod model to create Pods, and controllers ensure that running Pods match the deployment defined in the Pod model, for example by creating replicas corresponding to the number defined in the deployment.
How do Pods communicate with each other?
When a Pod is created, it is assigned its own unique IP address. If there are multiple containers in the Pod, they can communicate with each other simply by using localhost. Communications outside the Pod are achieved by exposing a port. Communications between Pods in a cluster take advantage of the fact that Kubernetes assigns a cluster private IP address to each pod in a cluster, eliminating the need to explicitly create links between Pods or map container ports to host ports.
In this way, each Pod in a cluster can talk to another without the need for NAT (Network Address Translation).
Controllers
As mentioned earlier, Pods are usually deployed indirectly via controllers. They are responsible for checking the status of deployed resources and maintaining the state of those resources even if there are potential failures such as the loss of a node.
ReplicaSets
Kubernetes allows us to create replicas of the same Pod within a cluster. To do this, we need to create a ReplicaSet to which we specify the number of replicas we want. In reality, when we create a ReplicaSet, a ReplicaSetController is created in the Controller Manager to monitor that the number of replicas alive in a Pod matches the specifications of the ReplicaSet.
Deployments
A Deployment is a deployment manifest for a ReplicaSet. It includes the number of containers as well as the characteristics of the ReplicaSets and Pods. Note that Deployment can be used for a resource creation as well as for an update of existing resources.
The namespaces
namespaces are logical spaces, virtual sub-clusters that are used to organize the various objects found in Kubernetes. Within a namespace, object names must be unique. In addition, using namespaces is interesting in the context of a cluster with several types of people having access to it. In particular, you can limit the resources consumed by a namespace.
Services and Ingress
When creating a ReplicaSet, network aspects are not taken into account. We therefore need to create a Service to enable communication. Creating a Service of type ClusterIP makes it possible to give the same IP to a set of Pods that will be accessible within the cluster and not outside it. There are different types of Service: (ClusterIP, NodePort, LoadBalance, ExternalIP,...)
The Ingress, on the other hand, are used to create routing rules to different Service. So, the cluster endpoint /service1 could refer to a Service which itself would refer to a set of Pods.
ConfigMap and Secret
Thanks to a ConfigMap, we'll be able to pass a set of key-values to Pods, in the form of environment variables. This kind of application is very practical in cases where we want to create container templates with behaviours that change depending on these environment variables.
In some cases, we may want this data to be encrypted: we therefore need to use a Secret for this.
Jobs
A Job is an ephemeral job parallelized across multiple Pods. A CronJob is the same thing but repeated over time at regular time intervals.
Statefulsets
StatefulSets are similar to deployments, but retain a "permanent identity" for each of the Pods. It is useful for applications where a stable network ID or persistent storage is required. A common example would be deploying ElasticSearch, Mysql or even Postgresql.
CronJobs
As its name suggests, CronJob manages time-based workloads. In our ElasticSearch example, a common job would be to send daily reports or clean up old data.
E - kubectl, the basic commands
We can pass instructions to our Kubernetes cluster via the command line kubectl. This interface allows us to execute commands that have a direct impact on basic configurations. By following a few simple syntax rules, using Kubectl is relatively straightforward. The CLI (Command Line Interface) supports Windows, Mac and Linux operating systems.
Let's simply choose the appropriate installation package to get started. Once the process is complete, we are free to use Kubectl. Installing k3s deploys all the tools we'll need to work properly, including kubectl.
Every Kubernetes developer or Administrator should have these commands in their toolkit, as they can accomplish a lot without massive effort. Efficiency is key when it comes to managing infrastructure.
It's important to have these commands in your toolkit.
It's important to have a basic understanding of the structure of commands. All commands use the following structure in the CLI, and it's essential to keep each component in order:
kubectl [command] [TYPE] [NAME] [Flag]
The command attribute describes the type of operation we wish to perform, namely create , describe , obtain , apply and delete. We can run these commands on one or more resources, as it is possible to designate multiple resources in the same command.
creategenerates new resources from files or standard input devices.describeretrieves the details of a resource or group of resources.getretrieves cluster data from various sources.deletedeletes resources as required.applygenerates or modifies resource configuration from standard input files or devices.
The TYPE attribute describes the type of resource that kubectl targets. What exactly are these resources? Things like a Pod, a Service, a Daemonset, a Deployment, a Replicaset, a statefulset, a Job and many more.
The NAME attribute is case-sensitive and specifies the name of the resource we want to create.
Finally, the Flag field is used to indicate special options or actions taken on the resource.
We have two possible types of command for configuring our kubernetes cluster:
Imperative configuration which involves creating Kubernetes resources directly on the command line on a cluster.
Declarative configuration which defines resources in manifest files ( configuration files) , then applies these definitions to the cluster. The YAML is the format used for declarative configuration. It is therefore important for an administrator to have the basics
We will now create our first resource. We'll start by creating a Pod that will use the nginx image.
We'll be able to do this in the following way with our command-line tool kubectl:
kubectl run nginx --image=nginx
Output display:
pod/nginx created
We have just created our first Pod. We can now list our Pod to validate its creation using the following command:
kubectl get pod
Output display:
NAME READY STATUS RESTARTS AGE
nginx 1/1 Running 0 2m20s
Output we have a Pod that was indeed created with the name nginx, which has the state READY at 1/1 which means that in this Pod we have a container running on the requested containers, so 1.
This result also tells us that the module is running thanks to the STATUS column, which is in the RUNNING state, that the module has never restarted.
We can see this from the RESTARTS column, which is at 0, and finally that it was executed 2m20s ago.
F - Configuration files
The YAML (Yet Another Markup Language) is a language used to provide configuration for applications, and is the main input type for Kubernetes configurations. It is human-readable and can be created in any text editor.
A Kubernetes user or administrator specifies data in a YAML file, typically to define a Kubernetes object. A Kubernetes Pod YAML file specifies the configuration of a Pod object.
Let's now create a Pod object using a YAML file. We can find the syntax on the Kubernetes documentation on the subject at this address.
Let's create a file called wordpress.yaml and put the following content in it:
apiVersion: v1
kind: Pod
metadata:
  name: wordpress
spec:
  containers:
  - name: wordpress
    image: wordpress
    ports:
    - containerPort: 80
At all times, Kubernetes checks that the actual state of the cluster corresponds to the desired state, i.e. the state declared in these files.
Such a file must therefore include the following keys:
apiVersion: the version of the Kubernetes API in which the object you wish to create is definedkind: the type of object we wish to create.metadata: metadata about the object (name, labels,...).specs: object specifications (desired state of the object).
Once the file has been created , we can apply this configuration to create our resource. Let's run the following command:
kubectl apply -f wordpress.yaml
Output display:
pod/wordpress created
We can now check our Pods:
kubectl get pod
Output display:
NAME READY STATUS RESTARTS AGE
nginx 1/1 Running 0 42m
wordpress 1/1 Running 0 36s
G - Deployment

Deployments allow us to specify a desired state for our Pods and ReplicaSets. Kubernetes' declarative system allows us to define how we want our containers to be run and managed, after which the deployment can issue declarative updates for the Pods and ReplicaSets in our cluster.
A deployment object is a process for changing a cluster state to the desired state without downtime.
The use of deployments is essential in many cases:
Deployments are used to automatically create new Pods and
ReplicaSets. The definition file contains specifications for Kubernetes to perform replication of Pods and ReplicaSets.Deployments provide us with a declarative way to describe the desired state of Pods and
ReplicaSets. The YAML definition file helps us specify what the final state of Pods andReplicaSetswill look like.Deployments allow us to restore a deployed cluster to a previous state if the current state is unstable.
Kubernetes keeps a history of deployments, so restores can be performed if necessary. This can be useful if we have a problem with the new version of our application that we want to deploy. Deployment restores also update the deployment revision.
- Deploys are handy when we need to scale to handle more workload. They help create more Pods and
ReplicaSetsin this situation.
We can configure our deployments to automatically increase the Pod workload as requirements increase by deploying more Pods.
Using deployments helps us maintain the stability and high availability of our containers. If a node goes down, we'll want to have a deployment or ReplicaSet in place to replace the failed Pods.
That's where we come in.
Unless we want to customise declarative orchestration updates, it's better to allow deployments to manage our ReplicaSets rather than manage them directly.
Without deployments, we'll create orphan Pods that won't be replaced in the event of a Pod failure.
Here are some of the benefits of using deployments:
Deployments automate setting up Pods, updating and scaling containerized applications.
Deployments are generally faster and less error-prone than manually creating our Pods, as Pod instances are automatically launched and executed as specified in the deployment definition on all cluster nodes.
The controller manager uses the deployment specification to know when to replace a failed Pod or inaccessible node, as it monitors the status of Pods and nodes. This ensures that business-critical applications continue to run.
It is possible to create the Deployment objects with imperative commands from our kubectl client.
Let's already delete the Pods created earlier in order to validate the behaviour when deleting our Pods.
We had two Pods, one is called nginx and the other wordpress:
kubectl delete pod nginx wordpress
Output display:
pod "nginx" deleted
pod "wordpress" deleted
We can try to retrieve the list of Pods to see if they have been recreated:
kubectl get pod
Output display:
No resources found in default namespace.
We find that the Pods are no longer present. The following YAML configuration creates a Deployment object that runs 10 replicas of a NGINX container.
To do this, let's create a deployment.yaml file with the following contents:
apiVersion: apps/v1
kind: Deployment
metadata:
  name: nginx-deployment
  labels:
    app: nginx-deployment
spec:
  selector:
    matchLabels:
      app: nginx-deployment
  replicas: 10
  strategy:
    type: RollingUpdate
  template:
    metadata:
      labels:
        app: nginx-deployment
    spec:
      containers:
        - name: nginx
          image: nginx
          ports:
            - containerPort: 80
spec.replicas: specifies the number of Pods to run.strategy.type: specifies the deployment strategy to use. In our case, we specifyRollingUpdate, which means that if we update the application with a new deployment, new versions are progressively deployed to Pods to avoid downtime.spec.containers: specifies the container image to run in each of the Pods and ports to expose.
Once we have created our file , we can apply this configuration to create our object:
kubectl apply -f deployment.yaml
Output display:
deployment.apps/nginx-deployment created
We can now check what has been created using this file. We can do this using the following command:
kubectl get all # Allows us to retrieve all available resources.
We can notice that we have several resources that have been created:
ten Pods
Nginxwith an identical hash695858cd9dand differentIDof a Pod in order to uniquely identify each Pod.a deployment called
nginx-deployment.a
Replicasetcallednginx-deployment-695858cd9d.
We could have obtained the same result with the following command:
kubectl create deployment nginx-deployment --image=nginx --replicas=10
Delete our deployment nginx-deployment and create it again with the imperative command:
kubectl delete deployment nginx-deployment
kubectl create deployment nginx-deployment --image=nginx --replicas=10
Let's check all the resources present:
kubectl get all
Output display:
NAMEREADY STATUS RESTARTS AGE
pod/nginx-deployment-5fbdf85c67-9pkch 1/1 Running 0 72s
pod/nginx-deployment-5fbdf85c67-69j2c 1/1 Running 0 72s
pod/nginx-deployment-5fbdf85c67-rcmds 1/1 Running 0 72s
pod/nginx-deployment-5fbdf85c67-pndcx 1/1 Running 0 72s
pod/nginx-deployment-5fbdf85c67-x2vw9 1/1 Running 0 72s
pod/nginx-deployment-5fbdf85c67-2gwcb 1/1 Running 0 72s
pod/nginx-deployment-5fbdf85c67-x9xqr 1/1 Running 0 72s
pod/nginx-deployment-5fbdf85c67-qdrzs 1/1 Running 0 72s
pod/nginx-deployment-5fbdf85c67-p7zr9 1/1 Running 0 72s
pod/nginx-deployment-5fbdf85c67-8h42g 1/1 Running 0 72s

NAME TYPE CLUSTER-IP EXTERNAL-IP PORT(S) AGE
service/kubernetes ClusterIP 10.43.0.1 <none> 443/TCP 6h21m

NAME READY UP-TO-DATE AVAILABLE AGE
deployment.apps/nginx-deployment 10/10 10 10 72s

NAME DESIRED CURRENT READY AGE
replicaset.apps/nginx-deployment-5fbdf85c67 10 10 10 72s
We have the same number of objects present on our cluster. We can also list our deployments as follows:
kubectl get deployment # or "kubectl get deploy" , using the abbreviation deploy
Output display:
NAME READY UP-TO-DATE AVAILABLE AGE
deployment.apps/nginx-deployment 10/10 10 10 72s
We can see the list of resources within a kubernetes cluster and their abbreviations using the following command:
kubectl api-resources
The SHORTNAMES column gives us the possible abbreviations for specifying our object types.
Now let's delete one of the Pods present on our cluster to check how Kubernetes is able to recover on its own.
We're going to delete a Pod nginx-deployment-[id] (replace the "id" field with your own) in the following way (choose a pod from your list at random):
kubectl delete Pod nginx-deployment-[ID]
Let's now display the list of Pods:
nginx-deployment-5fbdf85c67-69j2c 1/1 Running 0 1h
nginx-deployment-5fbdf85c67-rcmds 1/1 Running 0 1h
nginx-deployment-5fbdf85c67-pndcx 1/1 Running 0 1h
nginx-deployment-5fbdf85c67-x2vw9 1/1 Running 0 1h
nginx-deployment-5fbdf85c67-2gwcb 1/1 Running 0 1h
nginx-deployment-5fbdf85c67-x9xqr 1/1 Running 0 1h
nginx-deployment-5fbdf85c67-qdrzs 1/1 Running 0 1h
nginx-deployment-5fbdf85c67-p7zr9 1/1 Running 0 1h
nginx-deployment-5fbdf85c67-8h42g 1/1 Running 0 1h
nginx-deployment-5fbdf85c67-tg4dp 1/1 Running 0 3s
We can notice that we still have our ten Pods. The last one was created after deleting the Pod this in order to maintain the state of ten replicas we requested and creating our Nginx deployment.
Alternatives to the deployment object
The two common alternatives to the Kubernetes deployment object are:
DaemonSet: deploys a Pod to all nodes in the cluster or a certain subset of nodes
StatefulSet: used for stateful applications. Similar to deployment, but each Pod is unique and has a persistent identifier.
H - Kubernetes DaemonSet
A DaemonSet runs Pods on all cluster nodes or a selection of nodes within a cluster. Each time a node is added to the cluster, the DaemonSet controller checks whether it is eligible and, if so, runs the Pod on it. When a node is removed from the cluster, Pods are moved to place reclaim.
Deleting a DaemonSet also deletes the Pods it created.
Let's start by creating the daemonset.yaml file:
nano daemonset.yaml
The following YAML file shows how to run a DaemonSet that executes fluentd-elasticsearch for logging purposes:
apiVersion: apps/v1
kind: DaemonSet
metadata:
  name: fluentd-elasticsearch
  labels:
    k8s-app: fluentd-elasticsearch
spec:
  selector:
    matchLabels:
      name: fluentd-elasticsearch
  template:
    metadata:
      labels:
        name: fluentd-elasticsearch
    spec:
      containers:
      - name: fluentd-elasticsearch
        image: fluent/fluentd:v1.18.0-debian-1.0
We can apply this configuration within our cluster:
kubectl apply -f daemonset.yaml
Output display:
daemonset.apps/fluentd-elasticsearch created
Let's make sure we have our object present:
kubectl get daemonset # or alternatively "kubectl get ds"
Output display:
NAME DESIRED CURRENT READY UP-TO-DATE AVAILABLE NODE SELECTOR AGE
fluentd-elasticsearch 1 1 1 11 <none> 6s
Let's now look at the Pods present on our cluster, we will be able to notice that a Pod has been created by this daemonset:
kubectl get pod
Output display:
nginx-deployment-5fbdf85c67-9pkch 1/1 Running 0 18h
nginx-deployment-5fbdf85c67-69j2c 1/1 Running 0 18h
nginx-deployment-5fbdf85c67-rcmds 1/1 Running 0 18h
nginx-deployment-5fbdf85c67-pndcx 1/1 Running 0 18h
nginx-deployment-5fbdf85c67-x2vw9 1/1 Running 0 18h
nginx-deployment-5fbdf85c67-2gwcb 1/1 Running 0 18h
nginx-deployment-5fbdf85c67-x9xqr 1/1 Running 0 18h
nginx-deployment-5fbdf85c67-qdrzs 1/1 Running 0 18h
nginx-deployment-5fbdf85c67-p7zr9 1/1 Running 0 18h
nginx-deployment-5fbdf85c67-8h42g 1/1 Running 0 18h
fluentd-elasticsearch-w8s8c 1/1 Running 0 88s
The Pod fluentd-elasticsearch-[ID] was instantiated when our daemonset was created. Let's now remove this Pod and check the behaviour of kubernetes:
kubectl delete Pod fluentd-elasticsearch-[ID]
Output display:
Pod "fluentd-elasticsearch-w8s8c" deleted
Let's now check our Pods:
nginx-deployment-5fbdf85c67-9pkch 1/1 Running 0 18h
nginx-deployment-5fbdf85c67-69j2c 1/1 Running 0 18h
nginx-deployment-5fbdf85c67-rcmds 1/1 Running 0 18h
nginx-deployment-5fbdf85c67-pndcx 1/1 Running 0 18h
nginx-deployment-5fbdf85c67-x2vw9 1/1 Running 0 18h
nginx-deployment-5fbdf85c67-2gwcb 1/1 Running 0 18h
nginx-deployment-5fbdf85c67-x9xqr 1/1 Running 0 18h
nginx-deployment-5fbdf85c67-qdrzs 1/1 Running 0 18h
nginx-deployment-5fbdf85c67-p7zr9 1/1 Running 0 18h
nginx-deployment-5fbdf85c67-8h42g 1/1 Running 0 18h
fluentd-elasticsearch-7gtp9 1/1 Running 0 9s
We can see that a new Pod fluentd-elasticsearch-[ID] has been created to maintain the desired state of a Pod present for this daemonset.
I - Statefulset
A StatefulSet manages a group of Pods while maintaining a permanent identity for each Pod, with a persistent identifier that remains even if the Pod is stopped and/or restarted.
Pods also have persistent volumes that can store data describing the lifecycle of each individual Pod. Statefulsets are used for applications that need to store states like a database. Unlike deployment, which provides a different Pod when the Pod is deleted, the Statefulset returns us an identical Pod every time.
Good practice therefore recommends using deployments for stateless applications, and statefulset for stateful applications.
We're going to create a YAML file called statefulset.yaml that we'll use to run Mysql Pods. Kubernetes also allows us to pass variables just like docker does with the -e flag.
We will therefore provide values for the MYSQL_ROOT_PASSWORD variable which is the password for the root MySQL user, and the MYSQL_DATABASE variable which is the database we will be using for this instance of Mysql. We also have containerPort: 3306 which specifies the port exposed by the container, port 3306, the one used by Mysql by default.
We will in our file fill in the Statefulset declaration below:
apiVersion: apps/v1
kind: StatefulSet
metadata:
 name: mysql
spec:
 selector:
   matchLabels:
     app: mysql
 serviceName: mysql
 replicas: 1
 template:
   metadata:
     labels:
       app: mysql
   spec:
     containers:
     - name: mysql
       image: mysql:8
       ports:
       - containerPort: 3306
         name: mysql
       env:
       - name: MYSQL_ROOT_PASSWORD
         value: "datascientest@2024"
       - name: MYSQL_DATABASE
         value: "datascientest"
Let's now create our resource:
kubectl apply -f statefulset.yaml
Output display:
statefulset.apps/mysql created
let's check the list of our statefulsets:
kubectl get statefulset # or kubectl get sts
Output display:
NAME READY AGE
mysql 1/1 14m
Let's also check the Pod created by our statefulset:
nginx-deployment-5fbdf85c67-69j2c 1/1 Running 0 19h
nginx-deployment-5fbdf85c67-rcmds 1/1 Running 0 19h
nginx-deployment-5fbdf85c67-pndcx 1/1 Running 0 19h
nginx-deployment-5fbdf85c67-x2vw9 1/1 Running 0 19h
nginx-deployment-5fbdf85c67-2gwcb 1/1 Running 0 19h
nginx-deployment-5fbdf85c67-x9xqr 1/1 Running 0 19h
nginx-deployment-5fbdf85c67-qdrzs 1/1 Running 0 19h
nginx-deployment-5fbdf85c67-p7zr9 1/1 Running 0 19h
nginx-deployment-5fbdf85c67-8h42g 1/1 Running 0 19h
fluentd-elasticsearch-7gtp9 1/1 Running 0 63m
nginx-deployment-5fbdf85c67-tg4dp 1/1 Running 0 57m
mysql-deployment-0 1/1 Running 0 15m
We do have the Pod mysql-deployment-0 which is present and in the Running state. Let's remove this Pod and check the behaviour of our statefulset:
kubectl delete Pod mysql-deployment-0
Output display:
Pod "mysql-deployment-0" deleted
Let's now check the list of our Pods:
kubectl get pod
Output display:
nginx-deployment-5fbdf85c67-69j2c 1/1 Running 0 19h
nginx-deployment-5fbdf85c67-rcmds 1/1 Running 0 19h
nginx-deployment-5fbdf85c67-pndcx 1/1 Running 0 19h
nginx-deployment-5fbdf85c67-x2vw9 1/1 Running 0 19h
nginx-deployment-5fbdf85c67-2gwcb 1/1 Running 0 19h
nginx-deployment-5fbdf85c67-x9xqr 1/1 Running 0 19h
nginx-deployment-5fbdf85c67-qdrzs 1/1 Running 0 19h
nginx-deployment-5fbdf85c67-p7zr9 1/1 Running 0 19h
nginx-deployment-5fbdf85c67-8h42g 1/1 Running 0 19h
fluentd-elasticsearch-7gtp9 1/1 Running 0 65m
nginx-deployment-5fbdf85c67-tg4dp 1/1 Running 0 59m
mysql-deployment-0 1/1 Running 0 8s
We can see that we have a Pod mysql-deployment-0 which is still present, but which on the other hand was created last, proof that the Statefulset has indeed replaced the Pod with another Pod with an identical name.
Differences between a DaemonSet and a deployment
A DaemonSet is a type of Kubernetes resource that ensures that any node in the cluster is running at least one instance of a particular container. DaemonSets are useful for tasks that need to run on every node, such as collecting system metrics or security monitoring.
A deployment, meanwhile, is a type of Kubernetes resource that manages the scaling and updating of replicas of one or more containers. Deployments allow administrators to define update strategies, such as live or staged updates, as well as manage container failures.
In summary, a DaemonSet ensures that each node runs an instance of a container, while a deployment manages the scaling and updating of replicas of one or more containers. The two types of resource can be used together to provide a complete container management solution on a Kubernetes cluster.
J - Services

j.1 - Presentation
A service is an entity that exposes a set of Pods running an application or functional component. The service holds access policies and is responsible for enforcing these policies for incoming requests.
The need for services stems from the fact that Pods in Kubernetes are short-lived and can be replaced at any time. Kubernetes guarantees the availability of a given Pod and replica, but not the liveliness of individual Pods. This means that Pods that need to communicate with another Pod cannot rely on the IP address of the underlying single Pod. Instead, they connect to the service, which relays them to a relevant running Pod.
The service is assigned a virtual IP address, called a clusterIP, which persists until it is explicitly destroyed. The service acts as a reliable endpoint for communication between components or applications.
For native Kubernetes applications, an alternative to using services is to make requests directly via the Kubernetes API server. The API server automatically exposes and manages an endpoint for Pod execution.
A service uses labels (labels) and Selectors (selectors) to define which Pods to expose. A service can connect an application's front-end to a back-end, each running in a distinct deployment within the cluster.
A Kubernetes service can be configured using a YAML manifest. We can find more information on service objects by going to the documentation at https://kubernetes.io/docs/concepts/services-networking/service/.
Let's look at this configuration example:
apiVersion: v1
kind: Service
metadata:
  name: my-service
spec:
  selector:
    app: nginx
  ports:
    - protocol: TCP
      port: 80
      targetPort: 8080
Let's describe some parts of this YAML manifest:
kind: Service: specifies the type of object we are creating namely a service.metadata:name: this is the logical name of the service, which will also become the DNS name of the service when it is created.spec:selector: the selector identifies which Pods should be included in the service. In this example, Pods with the labelapp: nginxwill be selected by this service.spec:ports: a list of port configurations (there can be one or more, this is an array of elements). Each port configuration defines a network protocol and a port number. Optionally, the port configuration can define a targetPort, which is the port to which the Pod should send traffic.
j.2 - Kubernetes service types
ClusterIP
The ClusterIP service is the default type within Kubernetes. It receives an IP address internal to the cluster, making its Pods only accessible from the cluster. If necessary, we can define a specific IP in the service manifest, but the IP must be within the cluster's IP address range. We can expose our kubernetes objects using the notion of a service.
We will now use the kubectl command line to see how it is possible to expose our application to the world. Later we'll talk about the YAML syntax in order to declare our ClusterIP type services.
We can expose our nginx-deployment so that it is accessible only inside our cluster in the following way:
kubectl expose deploy nginx-deployment --port=80 --type=ClusterIP
Output display:
service/nginx-deployment exposed
Let's now check the list of our services:
kubectl get service # or kubectl get svc
Output display:
NAME TYPE CLUSTER-IP EXTERNAL-IP PORT(S) AGE
kubernetes ClusterIP 10.43.0.1 <none> 443/TCP 26h
nginx-deployment ClusterIP 10.43.139.215 <none> 80/TCP 100s
We notice that we have two services present:
the
kubernetesservice, which is the kubernetes API server. It exists as standard within all kubernetes clusters.the
nginx-deploymentservice, which is the service we just created that does indeed haveClusterIP as its type.
Now let's check that we have access to our Pods managed by the nginx deployment. We check by running a Pod that will start from the curlimages/curl image in order to run a curl command on our service IP 10.43.139.215:
kubectl run curl --image=curlimages/curl -i --tty -- sh
Output display:
If you don't see a command prompt, try pressing enter.
/ $
We are now connected to the Pod through a shell, as on Docker we have the ability to launch an interactive shell to run commands on our Pod.
Let's now run the curl command:
curl 10.43.139.215 # Replace with your deployment IP "nginx-deployment"
Output display:
<!DOCTYPE html>
<html>
<head>
<title>Welcome to nginx!</title>
<style>
html { color-scheme: light dark; }
body { width: 35em; margin: 0 auto;
font-family: Tahoma, Verdana, Arial, sans-serif; }
</style>
</head>
<body>
<h1>Welcome to nginx!</h1>
<p>If you see this page, the nginx web server is successfully installed and
working. Further configuration is required.</p>

<p>For online documentation and support please refer to
<a href="http://nginx.org/">nginx.org</a>.<br/>
Commercial support is available at
<a href="http://nginx.com/">nginx.com</a>.</p>

<p><em>Thank you for using nginx.</em></p>
</body>
</html>
You can exit from the interface with the exit
We have the Nginx home page displayed, proof that we can query the Pods in our nginx-deployment deployment. If we want to use manifests kubernetes YAML and create a service that will use a static IP, we can create a YAML file called serviceClusterIP.yaml.
First, let's check which labels are present on the Pods of the nginx deployment. We can run the following command:
kubectl get pod --show-labels
Output display:
NAME READY STATUS RESTARTS AGE LABELS
nginx-deployment-5fbdf85c67-69j2c 1/1 Running 0 21h app=nginx-deployment,Pod-template-hash=5fbdf85c67
nginx-deployment-5fbdf85c67-rcmds 1/1 Running 0 21h app=nginx-deployment,Pod-template-hash=5fbdf85c67
nginx-deployment-5fbdf85c67-pndcx 1/1 Running 0 21h app=nginx-deployment,Pod-template-hash=5fbdf85c67
nginx-deployment-5fbdf85c67-x2vw9 1/1 Running 0 21h app=nginx-deployment,Pod-template-hash=5fbdf85c67
nginx-deployment-5fbdf85c67-2gwcb 1/1 Running 0 21h app=nginx-deployment,Pod-template-hash=5fbdf85c67
nginx-deployment-5fbdf85c67-x9xqr 1/1 Running 0 21h app=nginx-deployment,Pod-template-hash=5fbdf85c67
nginx-deployment-5fbdf85c67-qdrzs 1/1 Running 0 21h app=nginx-deployment,Pod-template-hash=5fbdf85c67
nginx-deployment-5fbdf85c67-p7zr9 1/1 Running 0 21h app=nginx-deployment,Pod-template-hash=5fbdf85c67
nginx-deployment-5fbdf85c67-8h42g 1/1 Running 0 21h app=nginx-deployment,Pod-template-hash=5fbdf85c67
fluentd-elasticsearch-7gtp9 1/1 Running 0 172m controller-revision-hash=77fb4c7568,name=fluentd-elasticsearch,Pod-template-generation=1
nginx-deployment-5fbdf85c67-tg4dp 1/1 Running 0 166m app=nginx-deployment,Pod-template-hash=5fbdf85c67
mysql-deployment-0 1/1 Running 0 107m app=mysql,controller-revision-hash=mysql-64cc58b567,statefulset.kubernetes.io/Pod-name=mysql-deployment-0
curl 1/1 Running 1 (5m8s ago) 10m run=curl
We can check that these Pods have the labels app=nginx-deployment and Pod-template-hash=[ID]. So we're going to add a Selector to our service so that it selects these Pods.
We can have the following content in our serviceClusterIP.yaml file:
apiVersion: v1
kind: Service
metadata:
  name: monservice
spec:
  selector:
    app: nginx-deployment
  type: ClusterIP
  clusterIP: 10.10.5.10
  ports:
  - name: http
    protocol: TCP
    port: 80
    targetPort: 80
Let's then apply this configuration (the command will deliberately generate an error):
kubectl apply -f serviceClusterIP.yaml
Output display:
The Service "monservice" is invalid: spec.clusterIPs: Invalid value: []string{"10.10.5.10"}: failed to allocate IP 10.10.5.10: the provided IP (10.10.5.10) is not in the valid range. The range of valid IPs is 10.43.0.0/16
Kubernetes lets us know that the IP we want to assign to our service is not in the range required, in fact, Kubernetes reserves specific addresses for the cluster.
We need to provide it with an IP address in the 10.43.0.0/16 slot:
apiVersion: v1
kind: Service
metadata:
  name: monservice
spec:
  selector:
    app: nginx-deployment
  type: ClusterIP
  clusterIP: 10.43.5.10
  ports:
  - name: http
    protocol: TCP
    port: 80
    targetPort: 80
Once the IP has been modified and the range respected, we can apply our configuration:
kubectl apply -f serviceClusterIP.yaml
Let's run the curl command again from the Pod curl and check that our service is selecting the Pods in our deployments nginx. Our service can be reached on the IP address 10.43.5.10:
kubectl exec -it curl -- curl 10.43.5.10
Output display:
<!DOCTYPE html>
<html>
<head>
<title>Welcome to nginx!</title>
<style>
html { color-scheme: light dark; }
body { width: 35em; margin: 0 auto;
font-family: Tahoma, Verdana, Arial, sans-serif; }
</style>
</head>
<body>
<h1>Welcome to nginx!</h1>
<p>If you see this page, the nginx web server is successfully installed and
working. Further configuration is required.</p>

<p>For online documentation and support please refer to
<a href="http://nginx.org/">nginx.org</a>.<br/>
Commercial support is available at
<a href="http://nginx.com/">nginx.com</a>.</p>

<p><em>Thank you for using nginx.</em></p>
</body>
</html>
We are successfully joining our Pods.
NodePort
A NodePort service relies on the ClusterIP service, exposing it on a port accessible from outside the cluster. If we don't specify a port number, Kubernetes automatically chooses a free port.
The kube-proxy component is responsible for listening on the external ports of the node and forwarding client traffic from the NodePort service to the ClusterIP.
By default, all nodes in the cluster listen on the NodePort service, even if they are not running a Pod that matches the service selector. If these nodes receive traffic destined for the service, it is handled by Network Address Translation (NAT) and forwarded to the destination Pod.
The NodePort type service can be used to configure an external load balancer to forward network traffic from clients outside the cluster to a specific set of Pods. For this to work, we need to define a specific port number for the NodePort and configure the external load balancer to forward traffic to that port on all nodes in the cluster.
We also need to configure state checks in the external load balancer to determine whether a node is running healthy Pods.
The nodePort field in the service manifest is optional, but allows us to specify a custom port between 30000 and 32767.
As we did on ClusterIP type services, we can create a NodePort type service declaratively using YAML files , or imperatively using kubectl client commands.
We can proceed as follows to create our Nodeport-type service that will expose our nginx-deployment deployment outside the cluster:
kubectl delete svc nginx-deployment # We delete the clusterIP type service.
kubectl expose deployment nginx-deployment --port=80 --type=NodePort # We create the service of type NodePort
Output display:
service/nginx-deployment exposed
Now let's check the dynamic port assigned for connecting to our service:
kubectl get service # or kubectl get svc
Output display:
NAME TYPE CLUSTER-IP EXTERNAL-IP PORT(S) AGE
kubernetes ClusterIP 10.43.0.1 <none> 443/TCP 29h
monservice ClusterIP 10.43.5.10 <none> 80/TCP 19m
nginx-deployment NodePort 10.43.135.236 <none> 80:31347/TCP 71s
We have our NodePort service calling nginx-deployment which listens fine on port 31347 in TCP. This traffic will be redirected to the port 80 of the selected Pods. Let's go to our server's IP address and port 31347 to check the result.
We can do this from our browser:

We do have access this time from our browser to our Pods. We can also do this using YAML manifests and specify a static port so that it is no longer random. Let's create a file called serviceNodePort.yaml and put the following content in it:
apiVersion: v1
kind: Service
metadata:
  name: monservicenodeport
spec:
  type: NodePort
  selector:
    app: nginx-deployment
  ports:
    - name: http
      protocol: TCP
      port: 80
      targetPort: 80
      nodePort: 30000
We can check the list of services present:
kubectl apply -f serviceNodePort.yaml
kubectl get svc
Output display:
NAME TYPE CLUSTER-IP EXTERNAL-IP PORT(S) AGE
kubernetes ClusterIP 10.43.0.1 <none> 443/TCP 29h
monservice ClusterIP 10.43.5.10 <none> 80/TCP 29m
nginx-deployment NodePort 10.43.135.236 <none> 80:31347/TCP 11m
monservicenodeport NodePort 10.43.235.209 <none> 80:30000/TCP 8s
Let's validate that we can also join our Nginx Pods on our server's 30000 port:

LoadBalancer
A LoadBalancer service is based on the NodePort service and adds the ability to configure external load balancers within public and private clouds. It exposes services running within the cluster by transferring network traffic to cluster nodes.
The LoadBalancer service type allows us to implement dynamically external load balancers. This usually requires an integration running inside the Kubernetes cluster, which performs monitoring of LoadBalancer services. We have the option of installing a load balancer for our kubernetes clusters in our datacenters called MetalLB.
MetalLB provides a network load balancer implementation that integrates with standard network equipment, so external services on bare-metal clusters "work" just fine.
For the LoadBalancer service, we can also run the following command to expose our nginx-deployment deployment:
kubectl expose deployment nginx-deployment --port=80 --type=LoadBalancer # We create the LoadBalancer type service.
To create a service of type LoadBalancer using YAML manifests, we can create a file called serviceLoadBalancer.yaml and we can fill in the following content:
apiVersion: v1
kind: Service
metadata:
  name: monserviceloadbalancer
spec:
  type: LoadBalancer
  clusterIP: 10.43.5.11
  loadBalancerIP: 168.196.90.10
  selector:
    app: nginx-deployment
  ports:
    - name: http
      protocol: TCP
      port: 80
      targetPort: 80
By default, the strategy used by the LoadBalancer is "round-robin ". The round-robin algorithm sends traffic to a sequence of eligible pods in a predetermined order.
For example, if you have five pods in a round-robin configuration, the load balancer sends the first request to pod 1, the second request to pod 2, and so on in a repeating cycle.
The round-robin algorithm is static, which means that it does not take into account variables such as the current load of a particular server. This is why round-robin is generally preferred for test environments and not for production traffic.
There are other strategies such as "Consistent Hash" if, for example, you need persistence on a given session to the same pod. This strategy is useful for Kubernetes services that need to maintain one state per client. Without this strategy, a user of a website would be forced to log in at every page change while browsing.
j.3 - Discovering Kubernetes services
There are two methods for components in a Kubernetes cluster to discover a service:
DNS - when DNS is enabled, a DNS server is added to a Kubernetes cluster. This server monitors relevant Kubernetes API requests and creates a DNS record for each new service created. This allows all Pods in the cluster to perform service name resolution.
Environment variables_* - the kubelet adds environment variables for all Pods running on a node for each active service. This allows Pods to access other Pods corresponding to a service. However, this method only works if the service was created *_before** the Pods using that service (otherwise the required environment variables will not exist).
K - Replicaset Kubernetes
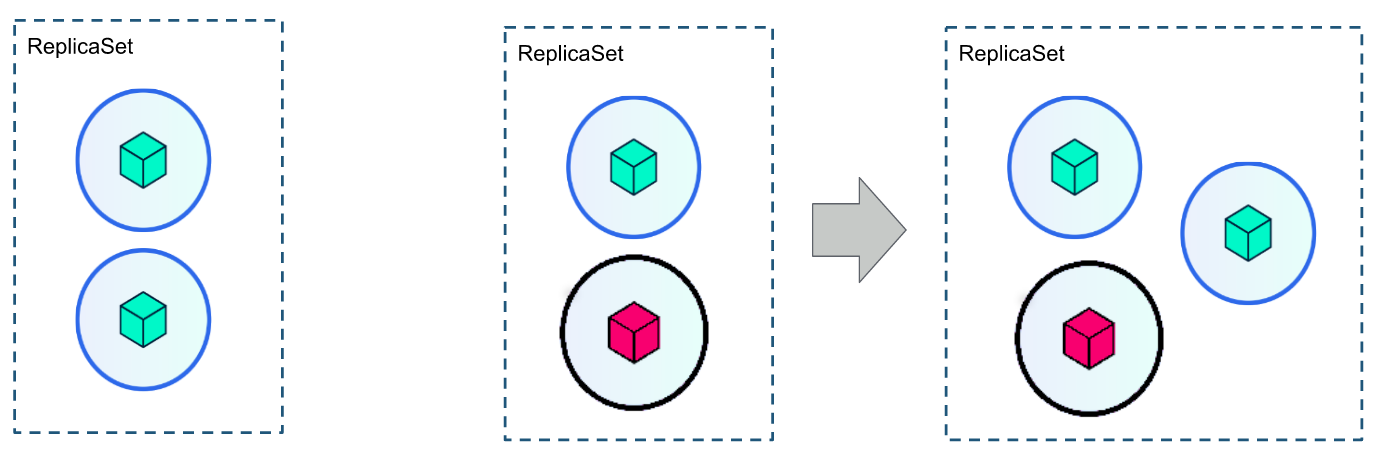
k.1 - Overview
A ReplicaSet is a process that runs multiple instances of a Pod, its purpose is to maintain the specified number of Pod instances running in a cluster to prevent users from losing access to their application when a Pod fails or is inaccessible.
The ReplicaSet helps to set up a new instance of a Pod when the existing one fails, to scale it when the running instances do not reach the specified number, and to reduce or delete Pods if another instance with the same label is created.
A ReplicaSet ensures that a specified number of Pod replicas run continuously and helps to balance the load if resource usage increases.
**k.2 - Creating a Replicaset
Creating the nginx-deployment has created a Replicaset which drives all the Pods in the deployment. We can check the list of replicasets present with the following command:
kubectl get replicaset # or kubectl get rs
Output display:
NAME DESIRED CURRENT READY AGE
nginx-deployment-5fbdf85c67 10 10 10 44h
We can now change our number of Pod replicas, because at the moment we have 10 as our output shows us. We are going to reduce our number of replicas of our nginx-deployment to a single Pod as follows:
kubectl scale deploy nginx-deployment --replicas=1
Output display:
deployment.apps/nginx-deployment scaled
We can check our Replicaset again:
kubectl get rs
Output display:
NAME DESIRED CURRENT READY AGE
nginx-deployment-5fbdf85c67 1 1 1 44h
We can now check the list of our Pods:
kubectl get pod
Output display:
nginx-deployment-5fbdf85c67-x2vw9 1/1 Running 0 44h
fluentd-elasticsearch-7gtp9 1/1 Running 0 25h
mysql-deployment-0 1/1 Running 0 24h
curl 1/1 Running 1 (23h ago) 23h
We now only have one Pod which is managed by nginx-deployment. We are now going to create a Replicaset which will be responsible for managing Pods which will be created from the httpd image. Let's create the replicaset.yaml file and fill in the following content:
apiVersion: apps/v1
kind: ReplicaSet
metadata:
    name: httpd-replicaset
spec:
    replicas: 3
    selector:
       matchLabels:
          app: httpd
    template:
       metadata:
          labels:
            app: httpd
            env: dev
       spec:
          containers:
          - name: httpd
            image: httpd
We can apply this configuration to our cluster :
kubectl create -f replicaset.yaml
Output display:
replicaset.apps/httpd-replicaset created
We can check the list of our ReplicatSet is running:
kubectl get replicaset
Output display:
NAME DESIRED CURRENT READY AGE
nginx-deployment-5fbdf85c67 1 1 1 45h
httpd-replicaset 3 3 3 104s
We can get more details with the describe command, which allows us to look in detail at our Replicaset and the events created:
kubectl describe replicaset httpd-replicaset
We have the details of the Replicaset. The describe command is available for all Kubernetes objects and is very useful when troubleshooting to understand what actually happened and if we have errors, we can also get the causes.
We can also filter a list with the name of the resource we want in the following way:
kubectl get rs httpd-replicaset
Output display:
NAME DESIRED CURRENT READY AGE
httpd-replicaset 3 3 3 8m10s
We have the following information:
Name: This is the name of the ReplicaSet declared as a child of the metadata property.
Desired: This is the number of replicas specified in the YAML manifest file.
Current**: This is the current state of the ReplicaSet, telling us that 3 replicas are in place.
Ready**: The 3 replicas specified are ready and running.
Age**: How long the 3 replicas have been running.
We can check the status of the running Pods in the ReplicaSet httpd-replicaset:
kubectl get pods| grep httpd-replicaset
Output display:
httpd-replicaset-lfzfw 1/1 Running 0 14m
httpd-replicaset-rzcbx 1/1 Running 0 14m
httpd-replicaset-vlrhl 1/1 Running 0 14m
Setting the scene:
The number of Pods in an application can be increased or reduced, depending on the situation, in two ways.
You can modify the configuration file we created earlier by adjusting the property value to increase or decrease the number of Pods.
For this exercise, you need to do it on the command line (imperative mode), which is the second method. You need to change the number of Pod replicas from 3 to 5 for the Replicaset
httpd-replicaset.
To summarise and better understand how they work, here are the major differences between a "Deployment" and a "ReplicaSet" :
| Deployment | ReplicaSet |
|---|---|
| High-level abstractions that manage replica sets. It provides additional functionality such as continuous updates, rollbacks, and application version management. |
A lower-level abstraction that manages the desired number of replicas of a pod. In addition, it provides basic scaling and self-healing mechanisms. |
| Deployment manages a pod model and uses replica sets to ensure that the specified number of pod replicas are running. | ReplicaSet only manages the desired number of replicas of a pod. |
| Deployment provides a mechanism for application updates and rollbacks, enabling seamless updates and reducing downtime. | Applications must be manually updated or rolled back. |
| It provides a version of the application, allowing us to manage multiple versions of the same application. It also makes it easy to revert to a previous version if necessary. | ReplicaSet does not offer this functionality. |
L - Namespaces

l.1 - Presentation
Namespaces_* (Namespaces) are used to isolate, group and organize resources within a Kubernetes cluster. In many use cases, creating Kubernetes Namespaces can help us streamline operations, improve *_security**, and even improve performance.
We can think of Namespaces as a type of virtual cluster or subcluster that provides scope for workloads within a Kubernetes cluster. Resource names must be unique within a Namespaces, but this rule does not apply between Namespaces.
Here are some important concepts to keep in mind when working with Namespaces:
Resources within Namespaces are logically separate from each other, but they can always communicate.
Namespaces do not provide true multi-tenancy as other solutions do (such as public cloud virtual infrastructure or Openstack private cloud).
There is a single default Kubernetes Namespace called
Default, but you can create as many Namespaces as you need in a cluster.Namespaces cannot be nested within each other.
Identifying Kubernetes resources with Namespace
Most Kubernetes resources reside in a Namespace but some objects exist at the cluster level. To display the API resources and see which ones have Namespaces in a Kubernetes cluster, we can use the kubectl command.
We'll notice that some resources, such as nodes and persistent volumes, don't depend on Namespaces; they're available throughout the cluster.
Let's check as follows:
kubectl api-resources
Output display:
### Resources with a value of "False" in the "NAMESPACED" column do not depend on Namespaces

NAME SHORTNAMES APIVERSION NAMESPACED KIND
bindings v1 true Binding
componentstatuses cs v1 false ComponentStatus
configmaps cm v1 true ConfigMap
.... traefik.containo.us/v1alpha1 true TLSStore
traefikservices traefik.containo.us/v1alpha1 true TraefikService
**Why are Kubernetes Namespaces important?
There are many reasons why we need to use distinct Namespaces instead of placing all resources in a single (default) Namespace. Using a single Namespace can create name conflicts for Kubernetes resources such as deployments, services and other objects.
These conflicts can lead to issues such as the visibility of environment variables and secrets in different application modules. Using Namespaces can help us avoid these problems.
**When to use Kubernetes Namespaces
Let's look at some common use cases for Kubernetes Namespaces:
Large teams can use Namespaces to isolate their microservices ** Teams can reuse the same resource names in different workspaces without conflicts. What's more, acting on elements in one workspace never affects other workspaces.
Organizations that use a single cluster for development, testing and production can use Namespaces to isolate the environments.** This practice ensures that production code is not affected by changes made by developers in their own Namespaces.
Namespaces allow the use of RBAC, so that teams can define roles that group together lists of permissions.** RBAC can ensure that only authorized users have access to the resources in a given Namespace.
Users can set resource limits on Namespaces by defining resource quotas.** These quotas can ensure that each project has the resources it needs to run and that a Namespace does not monopolize all available resources.
Namespaces can improve performance by limiting API search items.** If a cluster is separated into multiple Namespaces for different projects, the Kubernetes API will have fewer items to search for when executing operations. As a result, teams can see performance gains within their Kubernetes clusters.
Now that we've covered what Namespaces are and when to use them, let's move on to how to use them.
**l.2 - Namespace implementation
The default Namespace in Kubernetes*.
Most Kubernetes distributions will create three or four Namespaces by default. We can see these default Namespaces when we create a new cluster using the kubectl client.
kubectl get namespace
Output display:
NAME STATUS AGE
default Active 2d5h
kube-system Active 2d5h
kube-public Active 2d5h
kube-node-lease Active 2d5h
Let's describe the usefulness of these different default namespaces:
default: used by default by user applications, until other custom Namespaces exist.
kube-public**: used by public Kubernetes resources, not recommended for cluster users.
kube-system** : used by the Kubernetes control plane and should not be used by cluster users.
kube-node-lease**: These namespaces contain [Lease] objects (https://kubernetes.io/docs/reference/kubernetes-api/cluster-resources/lease-v1/) associated with each node. Node leases allow the kubelet to send heartbeats (https://kubernetes.io/docs/concepts/architecture/nodes/#heartbeats) so that the control plane can detect a node failure. In addition, the "node-lease" is a Kubernetes resource used to allow nodes to indicate their availability and use of it.
Namespaces work
We can create Namespaces using the kubectl client in the following way:
kubectl create namespace datascientest
Output display:
namespace/datascientest created
Let's now check the list of our Namespaces :
kubectl get namespaces # or kubectl get ns
Output display:
NAME STATUS AGE
default Active 2d5h
kube-system Active 2d5h
kube-public Active 2d5h
kube-node-lease Active 2d5h
datascientest Active 76s
We can also list the resources deployed in the datasicentest namespace by adding the -n or --namespace flag to specify the namespace name:
kubectl get all -n datascientest
Output display:
No resources found in datascientest namespace.
So we don't have any resources in this Namespace , so it's time we could change that. We're going to create a deployment called wordpress in the Namespace Datascientest and we're going to create 3 replicas of our Pods.
kubectl create deployment wordpress --image=wordpress --replicas=3 --namespace datascientest
Output display:
deployment.apps/wordpress created
We can then list deployments and Pods in the datascientest namespace as follows:
kubectl get pod,deploy -n datascientest
Output display:
NAME READY STATUS RESTARTS AGE
pod/wordpress-5587844794-njnct 1/1 Running 0 16h
pod/wordpress-5587844794-2tlm4 1/1 Running 0 16h
pod/wordpress-5587844794-d56r9 1/1 Running 0 16h

NAME READY UP-TO-DATE AVAILABLE AGE
deployment.apps/wordpress 3/3 3 3 16h
Case study:
You will need to decrease the number of Pod replicas in the Wordpress deployment to 1 and expose the Wordpress application via a
NodePorttype service.The port to use is
30001.You can create a
datascientest-wordpressdirectory to include the YAML file for the service.
Let's reduce the number of Pods:
kubectl scale deploy wordpress --replicas=1 -n datascientest
Output display:
deployment.apps/wordpress scaled

Wordress is a very versatile tool for building websites. And 25% of the websites we know today run on Wordpress. Before moving on, feel free to continue installing and exploring the solution.
