
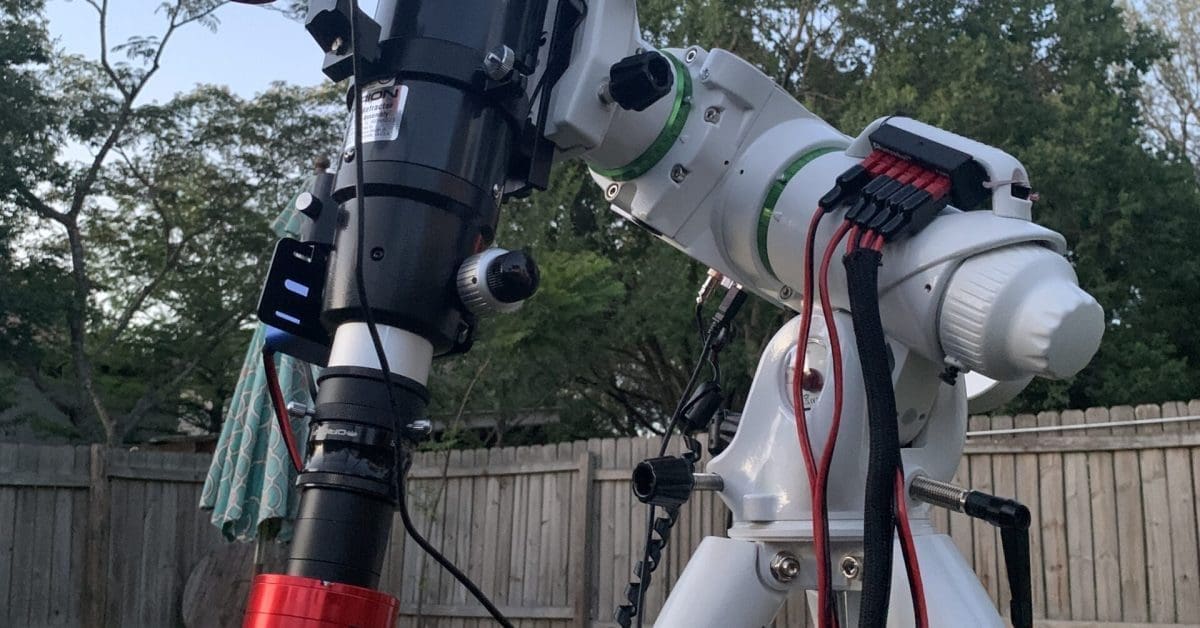
Learning through the firehouse has been fun and challenging at times. I love the challenge of something new, but at the same time, I’d just like to get some images and not struggle so much. I’ve decided to journal much of my learning so as the saying goes “my struggles, your gain”. This guide will hopefully help others running NINA with an EQ6R get up and running or at least avoid the same mistakes I did.
通过消防站学习有时是有趣和具有挑战性的。我喜欢新事物的挑战,但同时,我只想得到一些图像,而不是挣扎这么多。我决定把我学到的很多东西都写在日记里,就像俗话说的那样:“我的奋斗,你的收获”。本指南将希望帮助其他人运行NINA与EQ6R起床和运行或至少避免同样的错误,我没有。
EQ Mounts and NINA EQ底座和NINA
The eq6r pro is an equatorial tracking go-to mount. When used in conjunction with NINA, Nina can be used to control the mount and integrate it with some advanced features to optimize your astrophotography sessions. This includes replacing the need to use the hand controller, plate solving for position, polar alignment for alignment and of course acting as the broker between phd2, your mount and sequencing of images.
eq6r pro是一款赤道追踪的首选坐骑。当与NINA配合使用时,Nina可用于控制支架,并将其与一些高级功能集成,以优化您的天文摄影会话。这包括取代需要使用手动控制器,板解决的立场,极性对齐,当然作为中间人之间的phd 2,你的安装和测序的图像。
This guide will walk you through getting everything up and running so you can guide, plate solve and slew with NINA. This guide should work with any of the EQ5/6/8 mounts based on the same drivers/setup.
本指南将引导您完成一切启动和运行,以便您可以指导,板解决和与NINA回转。本指南应适用于基于相同驱动程序/设置的任何EQ5/6/8安装。
- Install ASCOM Tools & Required Dependencies
安装ASCOM工具和所需的配置文件 - Install EQMOD Mount Driver
安装EQMOD安装驱动程序 - Install Platesolver (ASTAP)
安装Platesolver(ASTAP) - Install ASTAP star catalog
安装ASTAP星星星表 - Install PHD2 Guiding 安装PHD 2导向装置
- Install NINA 安装NINA
- Configure NINA 配置NINA
- Configure EQMOD 配置EQMOD
- Configure PHD2 配置PHD2
Gear in Guide 导向装置中的齿轮

Sky Watcher EQ6—R—全计算机化后藤德国赤道望远镜支架—皮带驱动、电动、计算机化手动控制器,拥有42,900多个天体数据库
- PRECISE ACCURATE GOTO: Computerized, motorized GoTo German equatorial telescope mount capable of accurately tracking astronomical objects for both...
精确准确的后藤:计算机化,机动后藤德国赤道望远镜安装能够准确跟踪天文物体为两个. - BELT DRIVEN STEPPER MOTORS provide whisper-quiet slewing with renowned precision and accuracy while virtually eliminating Periodic Error
皮带驱动步进电机提供安静的回转,具有著名的精度和准确性,同时几乎消除了周期性误差 - 44-POUND PAYLOAD: Beefy, all-metal construction provides 44-pound payload capacity, perfect for all but the heaviest optical tubes
44-磅有效载荷:结实,全金属结构提供44磅的有效载荷能力,完美的所有,但最重的光学管 - BUILT-IN ILLUMINATED POLAR FINDERSCOPE provides quick and easy polar alignment
内置的带照明的极轴探测器提供快速简单的极轴对准 - 42,000plus OBJECT DATABASE: SynScan hand controller with 42,000plus object database will keep even the most experienced astronomer busy for countless...
42,000多个天体数据库:SynScan手动控制器拥有42,000多个天体数据库,即使是最有经验的天文学家也会忙碌上无数天。

ZWO ASI 290 MM-MINI 2.1 MP CMOS单色天文相机,带USB 2.0 #ASI 290 MM-MINI
- ZWO ASI290MM-Mini monochrome astronomy camera for autoguiding during astrophotography or for monochrome imaging of planets, the Moon, and Sun (with...
ZWO ASI 290 MM-微型单色天文相机,用于天文摄影过程中的自动导航或行星、月球和太阳的单色成像(带... - 2.1 megapixel CMOS sensor with small 2.9-micron pixels, 1936x1096 resolution, and high QE and low noise enable detection of fainter guide stars
2.1 200万像素CMOS传感器,2.9微米像素,1936 x1096分辨率,高QE和低噪声,可检测较暗的导航星 - Fast USB2.0 data transfer at up to 20.4 frames per second at maximum resolution
快速USB2.0数据传输速度高达每秒20.4帧,最高分辨率 - Compact, lightweight, and attractive red anodized CNC aluminum body stands up to heavy field use and slides directly into 1.25” focuser of telescope...
紧凑,重量轻,和有吸引力的红色阳极氧化铝数控机身站起来,以沉重的领域使用和幻灯片直接进入1.25”望远镜调焦. - Camera electronics draw power from your computer’s USB2.0 interface with Type C USB connector; All software and drivers are available from the...
相机电子设备通过C型USB连接器从计算机的USB2.0接口获取电源;所有软件和驱动程序都可从.

ZWO ASI 120 MM-S 120万像素CMOS单色超高速天文相机带USB 3.0#ASI 120 MM-S
- ZWO ASI120MM-S 1.2 megapixel monochrome astronomy camera for capturing monochrome images of the Moon, planets, brighter deep sky objects, and the Sun...
ZWO ASI 120 MM-S 120万像素单色天文相机,用于拍摄月球、行星、更明亮的深空天体和太阳的单色图像。 - Uses CMOS camera sensor with 1280x960 resolution; USB3.0 data transfer at up to 60 frames per second at maximum resolution and 254 frames per second...
采用1280 x960分辨率的CMOS摄像头传感器; USB3.0数据传输速度最高可达每秒60帧,最高分辨率为每秒254帧。 - Compact, lightweight, and attractive red anodized CNC aluminum body stands up to heavy field use; Connects to 1.25” telescope focusers with included...
紧凑、轻巧、美观的红色阳极氧化铝CNC机身,可承受繁重的野外使用;连接到1.25”望远镜调焦器,包括: - Camera electronics draw power from your computer’s USB interface; All software and drivers are available from the manufacturer’s website;...
相机电子设备从计算机的USB接口获取电源;所有软件和驱动程序均可从制造商的网站获得;. - NOT Compatible with MacOS
与MacOS不兼容
Affiliate links & Product Images are from Amazon Product Advertising API.
联盟链接和产品图片来自亚马逊产品广告API。
Install ASCOM Suite 所有ASCOM套房
Before we can do anything, we must have the ascom software installed.
在我们做任何事情之前,我们必须安装ascom软件。
Nina currently supports ASCOM 6.4 SP1 “officially”. 6.5 is still too new and may not support everything that 6.4 does so it’s best to stick to 6.4 sp1 for now.
Nina目前“正式”支持ASCOM 6.4 SP1。6.5仍然太新,可能不支持6.4的所有功能,所以现在最好坚持使用6.4 sp1。
Download Link: 下载链接:
https://github.com/ASCOMInitiative/ASCOMPlatform/releases/tag/v6.6SP2Release
Scroll to the bottom of the page and download the AscomPlatform662.4195.exe
滚动到页面底部并下载AscomPlatform662.4195.exe
Install .NET 3.5/2.0 安装. NET 3.5/2.0
Before you can install ASCOM 6.4 – Make sure you have .NET 3.5 SP1 installed (or the install will fail).
在安装ASCOM 6.4之前—确保已安装. NET 3.5 SP1(否则安装将失败)。
https://dotnet.microsoft.com/download/dotnet-framework/net35-sp1
You may have .NET 3.5sp1 installed already, it will let you know. If you are on a new PC or have pending updates, you may have to reboot after installing this update before continuing.
你可能已经安装了. NET 3.5sp1,它会让你知道。如果您使用的是新电脑或有挂起的更新,则可能需要在安装此更新后重新启动计算机,然后才能继续。

I’m not sure why the .NET 3.5 SP1 download is so large when it downloads more, but whatever… .NET 2.0 is good for other astronomy tools you may use so I let this do what it does. (CCDtools and such uses really old .NET)
我不知道为什么. NET 3.5 SP1下载量如此之大,当它下载更多时,但无论如何....... NET 2.0对您可能使用的其他天文工具都很好,所以我让它做它做的事情。(CCDtools等使用非常旧的. NET)
Wait out the install and it should finish up like this
等待安装完成后,它应该像这样完成

Install Ascom 6.4 sp1 安装Ascom 6.4 sp1
Run “ASCOMPlatform64.exe” downloaded from previous step
运行从上一步下载的“ASCOMPlatform64.exe”

Click Next 单击下一步

Defaults work here – Click Install
在此处安装-单击安装

Click Finish 单击finish
Now we have the base ASCOM stuff installed. Time to install the Mount Drivers for ASCOM
现在我们已经安装了基本的ASCOM东西。安装ASCOM装载驱动程序的时间
Install EQMOD Mount Drivers & Software
所有EQMOD MOUNT驱动程序和软件
The most common software is EQAMOD. There is a new & upcoming Green Swamp server that looks rather good, but I don’t have enough experience with it to recommend it right now.
最常用的软件是EQAMOD。有一个新的即将推出的绿色沼泽服务器,看起来相当不错,但我没有足够的经验,它推荐现在。
EQMOD EQAscom is available to download here: https://sourceforge.net/projects/eq-mod/files/EQASCOM/
EQMOD EQAscom可在此处下载:https://sourceforge.net/projects/eq-mod/files/EQASCOM/
I recommend download and installing the latest releases – which as of this post is eqascom 200q
我建议下载并安装最新的版本-这篇文章是eqascom 200 q

Download that and let’s install it!
下载并安装它!

Click Next 单击下一步

Defaults work here – Click Next
在此处重新工作-单击下一步

Click Install 单击安装

If you want to read the doc or release notes, you can leave that selected. Otherwise uncheck them and click finish
如果你想阅读文档或发行说明,你可以保持选中状态。否则,取消选中它们并单击完成
Install N.I.N.A 安装N.I.N.A
Nina should set up any dependencies needed for its install. Just click next through and finish when done.
Nina应该设置安装所需的任何依赖项。只需点击下一步通过和完成时完成。
I recommend downloading and installing 1.10hf6 or newer.
我建议下载并安装1.10hf6或更新版本。
Configure Com Ports in Windows
在Windows中配置COM端口
Lets open Device Manager in Windows – Easy to just start searching in the windows 10 search bar
让我们在Windows中打开设备管理器-轻松地在windows 10搜索栏中开始搜索

Select your Com Port – It should show up as Prolific USB-to-Serial (COM) of some number. Right Click and Choose Properties and click over to Port Settings tab.
选择您的COM端口-它应该显示为多产USB到串行(COM)的一些数字。右键单击并选择属性,然后单击端口设置选项卡。

Make sure your COM port is set to 115200 bits per second, 8 data bits, parity none and flow control none. (you can leave it at 9600… but for some reason i have better reliability at 115200))
确保您的COM端口设置为115200位每秒,8数据位,奇偶校验无和流量控制无。(you可以把它留在9600.但由于某种原因,我有更好的可靠性在115200))
Beware of COM port changing 🙂 Just in writing this documentation my COM port has changed from 7 to 4 – My USB hub doesn’t seem to keep them consistent between uses. Even if you click on that “Advanced button” and assign a comm port – it can / does still change on you if you move things to other USB ports or swap things around. It’s annoying.
注意COM端口的变化在写这篇文档的时候,我的COM端口已经从7变成了4-我的USB集线器似乎没有在使用之间保持一致。即使你点击了“高级按钮”并分配了一个USB端口-如果你把东西移到其他USB端口或交换东西,它仍然可以/确实会改变你。真烦人
Install ASTAP 所有ASTAP
Windows 10 likes to protect your PC, which is a good thing, but the software is trust worthy so if you get a screen like this:
Windows 10喜欢保护您的PC,这是一件好事,但该软件值得信赖,所以如果您获得这样的屏幕:

Click More Info (the underlined link)
点击更多信息(带下划线的链接)

Then click “Run Anway” 然后点击"Run Anway"

I like to leave it at defualts – Make a note of the path there if needed as we may need to confirm this in NINA. Click Next
我喜欢把它留在defualts -如果需要的话,在那里记下路径,因为我们可能需要在NINA中确认这一点。单击下一步

Click Next 单击下一步

I uncheck this as i have too many icons, but i’ve left it as default for this post. Click Next
我取消了这个,因为我有太多的图标,但我已经离开它作为默认为这篇文章。单击下一步

Click Install 单击安装

Click Next Again (lots of clicking for this small tool)
再次点击Next(这个小工具需要很多点击)

Uncheck Launch Astrometric stacking program and click Finish – we need to install a star catalog first
取消选中Launch Astrometric stacking program并单击Finish -我们需要首先安装一个星星星表
Install Star Catalog 所有星星目录
Again with Windows defender. Same process as above
再次使用Windows Defender。过程同上

Make sure the path where you want to install it matches the astap path above (should if you didn’t change it)
确保你想安装它的路径与上面的astap路径相匹配(如果你没有改变它的话,应该是这样)

Click Next 单击下一步

Click install 单击安装
Wait out while it installs your catalog of choice. I chose g18 but G17 works for most people (and is a bit smaller/faster)
等待它安装您选择的目录。我选择了G18,但G17适用于大多数人(而且更小/更快)

Click Finish! 单击完成!
Now we have an awesome platesolver and catalog ready to go so let’s set up NINA.
现在,我们有一个真棒印版解决方案和目录准备去,所以让我们设置尼娜。
Install NINA 安娜·尼娜
Run NinaSetup 运行NinaSetup
You may get this warning again.. it’s OK – Click Run Anyway
您可能会再次收到此警告。没关系—单击“无论如何运行”

Select that you agree to license agreement and click Install
选择您同意许可协议,然后单击安装

After clicking Install the setup moves quickly!
点击安装后,安装程序会快速移动!

You can click “Launch” and we’ll do some set up.
您可以点击“启动”,我们将做一些设置。
Once you have launched NINA you may be prompted by Windows Firewall to allow access.
一旦您启动了NINA,Windows防火墙可能会提示您允许访问。

The default settings work here – Click Allow Access. NINA needs to hit the internet to download data from Nasa’s website for framing wizard and other functionality. (as well as self-updates if you enable that)
默认设置在此工作-单击“允许访问”。NINA需要访问互联网从NASA的网站下载数据,以便使用框架向导和其他功能。(as以及自我更新(如果启用)
Configure NINA 配置NINA
We’ll focus on two things here – Platesolving and the EQ6r Mount Setup. Let’s make sure ASTAP is set up here:
我们将重点关注两件事-板解决和EQ 6 r安装设置。让我们确保ASTAP设置在这里:
Click Options on left main menu and then click PlateSolving on top tab
单击左侧主菜单上的选项,然后单击顶部选项卡上的PlateSolving

Set Plate Solver to Astap
将板解算器设置为Astap
Set Blind Solver to Astap
将盲解算器设置为Astap
Verify ASTAP Location is the same (should be, unless you changed it)
验证ASTAP位置是否相同(应该相同,除非您更改了它)
Set your exposure time – I use 4 seconds – works will with broadband and narrowband imaging for me. My Binning, Gain is for my specific camera. I recommend you set the Number of retries to 2 or more and set a decent delay between retries. 30 seconds may be fine, but I left it 60 seconds just to be safe. This comes in handy if you do multiple targets in a single night and want to sleep – if the platesolve fails it will get stuck if you don’t have a retry enable. Waiting out a timer often lets your mount settle or skies clear or cloud move away.
设置你的曝光时间-我用4秒-工程将与宽带和窄带成像为我。我的Binning,增益是为我的特定相机。我建议你将重试次数设置为2或更多,并在重试之间设置适当的延迟。30秒可能没问题,但为了安全起见我留了60秒。如果你在一个晚上做了多个目标并且想睡觉,这就派上用场了-如果印版解决失败,如果你没有重试启用,它就会卡住。等待一个计时器通常会让你的坐骑安定下来,或者天空晴朗,或者云消失。
Configure EQAscom 配置EQASCOM
Open Nina. Click on Equipment and then Scope. You should see a screen like this.
打开妮娜。点击设备,然后点击范围。你应该看到这样的屏幕。

Click the Config button there and the ASCOM set up will open up
单击此处的Config按钮,ASCOM设置将打开
Configure EQMOD 配置EQMOD

Make sure your COM port matches the one from Device Manager above. Set baud to 115200, Timeout to 2000 and Retry to 2. You will also want to fill out your Site Information with your lat/long/elevation.
确保您的COM端口与上面的设备管理器中的端口匹配。将波特率设置为115200,波特率设置为2000,波特率设置为2。您还需要填写您的网站信息与您的纬度/经度/海拔。
Input your site location (or allow site writes below)
输入您的网站位置(或允许网站写在下面)
You want to make sure that your mount has the correct Latitude and Longitude. If you select allow site writes per the image below, then you can always control your location via NINA.
你要确保你的坐骑有正确的纬度和经度。如果您选择允许网站写每下面的图片,那么你可以随时通过NINA控制你的位置。
Allow Site writes 允许站点写入
I use this so if you move around your location in NINA, you can allow NINA to set the location into ASCOM – it will pop up a dialog box asking if you want to do this. I find it reduces the mistake of having a bad site data and just keeping it updated in one area (especially if you use a GPS device for site in NINA)
我使用这个,所以如果你在NINA中移动你的位置,你可以允许NINA将位置设置为ASCOM—它会弹出一个对话框,询问你是否想这样做。我发现它减少了错误的有一个坏的网站数据,只是保持它在一个地区更新(特别是如果你使用GPS设备的网站在NINA)

Set up Pulse Guiding (should be default)
设置脉冲引导(应为默认值)

Connect to Mount in NINA
连接到NINA中的安装
Before we can hit other setup options (not sure why this isn’t in the settings screen, but oh well) we need to connect to the mount and click the expand icon to open up the side page.
在我们可以点击其他设置选项之前(不知道为什么这不在设置屏幕中,但是哦,好吧),我们需要连接到挂载并单击扩展图标打开侧页。
Click the power button once you have selected EQMOD ASCOM HEQ5/6 as your telescope
选择EQMOD ASCOM HEQ 5/6作为望远镜后,单击电源按钮

Once connected, you should see the EQMOD window pop up and take over your screen. Click the circled >>> Button to expand more options
连接后,您应该会看到EQMOD窗口弹出并接管您的屏幕。单击带圈的>按钮展开更多选项

Configure EQMOD Settings 配置EQMOD设置
Here we want to make sure we have a few settings set correctly.
在这里,我们要确保我们有一些设置正确设置。
- Increase pulse guide settings for RA Rate
增加右心房频率的脉冲引导设置 - Increase pulse guide settings for DEC Rate
增加DEC速率的脉冲指南设置 - Set User Interface to Dialog based
将用户界面设置为基于对话框 - Ensure your Site Information is correct
确保您的网站信息正确无误 - Configure Mount Limits 配置装载限制

PHD2 Guiding Setup PHD2引导设置
Download PHD2 下载PHD2
https://openphdguiding.org/downloads
Install PHD2 安装PHD2
Just like the other programs, you may be prompted to allow an insecure program to run on Windows. Click through and accept it per our instructions and install PHD2 with all defaults.
就像其他程序一样,系统可能会提示您允许不安全的程序在Windows上运行。点击并按照我们的说明接受它,并使用所有默认值安装PHD2。
Configure PHD2 配置PHD2
We’ll go back into NINA and launch PHD2 by going to Guider and clicking the Power button on PHD2
我们将返回NINA并通过转到Guider并单击PHD2上的Power按钮来启动PHD2

When you start PHD2 you should see a new profile wizard pop up.
当您启动PHD2时,您应该会看到一个新配置文件向导弹出。

I use a 290mm camera, so i selected ZWO ASI Camera from the Guide Camera dropdown and a box pops up asking if I want to configure pixel size. Click Yes.
我使用的是290mm相机,所以我从Guide Camera中选择了ZWO ASI Camera,然后弹出一个框,询问我是否要配置像素大小。取消禁用
You will want to enter your guide scope focal length here too. It’s important this is correct. For my old guide scope it was 225mm however, I switched to an OAG so I now use 545mm since my scope is currently reduced to 545mm.
你也要在这里输入你的引导范围焦距。这是正确的,这很重要。对于我的旧指南范围是225毫米,但我切换到一个OAG,所以我现在使用545毫米,因为我的范围目前减少到545毫米。

Click Next 单击下一步
On this next screen you should select EQMOD ASCOM HEQ5/6 as you rmount and once you do that, you’re prompted to allow it to confgure the guide speed settings automatically. Click YES.
在下一个屏幕上,您应该选择EQMOD ASCOM HEQ 5/6作为rmount,一旦您这样做,您将被提示允许它自动配置指南速度设置。取消禁用

Now you should see the .90 speed we set up earlier – important that this matches.
现在你应该看到我们之前设置的.90速度-重要的是这匹配。

Click Next 单击下一步

Click Proceed – I Do recommend you review that document – PHD2 can be complex to learn/tweak.
单击继续—我建议您查看该文档—PHD2可能很难学习/调整。

I don’t have AO, so click Next
我没有AO,因此单击“下一步

Give this profile a good name, make sure Build dark library is selected and I like to use “Auto restore calibration” myself. Some will swear by calibrating every night – which I do for the most part but if i have multiple nights in a row I can leave everything set up then I like that calibration is reloaded on startup and I can just start imaging.
给予这个配置文件一个好的名字,确保建立黑暗的图书馆是选定的,我喜欢使用"自动恢复校准"自己。有些人会发誓每天晚上校准—我做的大部分,但如果我有连续多个晚上,我可以离开一切设置,然后我喜欢校准是重新加载启动,我可以开始成像。
Click Finish 单击finish
Now the dark library wizard will pop up
现在黑暗图书馆向导将弹出

Make sure your guide scope is covered (cap on) or if you use an OAG, make sure your primary scope is covered. The dark library is used to help ensure good clean tracking and avoid guiding on hot pixels so I wouldn’t skip this step.
确保你的指导范围被覆盖(盖上),或者如果你使用OAG,确保你的主要范围被覆盖。黑暗的图书馆是用来帮助确保良好的清洁跟踪和避免指导热点像素,所以我不会跳过这一步。
Click start and let it build a dark library
点击开始,让它建立一个黑暗的图书馆
PHD2 Should start up now. I like to go enable a few things that give nice data on what is going on
PHD2现在应该启动了。我喜欢去启用一些东西,这些东西给予关于正在发生的事情的好数据
Click View and select these options:
单击“查看”并选择以下选项:

Now you will have a great status screen of what PHD2 is doing.
现在你将有一个很好的状态屏幕,显示PHD2正在做什么。
Calibrate PHD2 校准PHD 2
NINA has a few focus stars built in or you can connect to your mount with Stellarium or Cartes du Ciel. You want to select a star near zenith or you can use the hand controller or the EQMOD Control pad to slew near zenith.
NINA有几个内置的焦点星星,或者你可以用Stellarium或Cartes du Ciel连接到你的坐骑。你想选择一个靠近天顶的星星,或者你可以使用手控器或EQMOD控制板在天顶附近旋转。
What we want to do is:
我们要做的是:
- Connect to guide camera/scope
连接至导引摄像机/内窥镜 - Start Looping 开始循环
- Find Star 寻找星星
- Shift click the #4 to start calibrating
Shift键点击#4开始校准

Once you start calibration PHD2 will move the mount around and calibrate itself. If you have issues here with needing more calibration – there is a more detailed setup wizard you can run. However, I would advise you spend time on PHD2’s website and learn how all of this works. This guide is just the “getting started”
一旦开始校准,PHD2将移动支架并自行校准。如果您在需要更多校准方面有问题—您可以运行更详细的设置向导。然而,我建议你花时间在PHD2的网站上,了解所有这些是如何工作的。本指南只是“入门”
Time to Image 成像时间
This guide should get you all up and running so you can guide, plate solve and track correctly with EQMOD. If you have any questions or comments, please leave a comment below!
本指南应该让你所有的启动和运行,所以你可以指导,板解决和跟踪正确的EQMOD。如果您有任何问题或意见,请在下面留言!
End of Session Shutdown 会话结束关闭
A good habit to get into is to make sure that you park the scope when done. This just makes sure that everything is homed in good.
要养成的一个好习惯是确保在完成后停放瞄准镜。这只是为了确保一切都很好。
I like to make sure everything closes and parks at end of sequence like this:
我喜欢确保所有东西都关闭并停在序列的末尾,就像这样:
Options -> Imageing -> Sequence settings
选项->成像->序列设置

FAQ
I'm having difficulty plate solving with N.I.N.A.
我和N.I.N.A.在解盘子。
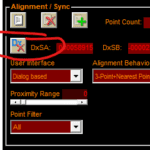
This happens to me when my mount is confused as to its current RA/DEC. Especially if you see lots of rejections. Make sure that you have followed the instructions to set the mount to Dialog based and you can run the DxX button to clear the old alignment data and start fresh.
当我的坐骑对当前的RA/DEC感到困惑时,这种情况就会发生。特别是当你看到很多拒绝的时候。确保您已按照说明将装载设置为基于对话框,并且您可以运行DxX按钮以清除旧的对齐数据并重新开始。
Why is PHD2 Guiding is inconsistent with an EQ6R Pro
为什么PHD 2指南与EQ6R Pro不一致
Be sure to calibrate with every session. Use your Planetarium software of choice to find a star at zenith (straight up). Slew to this star. Open PHD2, click stop tracking if tracking and shift-click the start tracking button. This will tell PHD2 to start calibrating
一定要在每一次训练中进行校准。使用您的天文馆软件的选择,以找到一个星星在天顶(直)。转向这个星星。打开PHD 2,如果正在跟踪,单击停止跟踪,然后按住Shift键单击开始跟踪按钮。这将告诉PHD 2开始校准


This is really good but I am stuck on step 1 which you haven’t covered. How to connect the mount to the laptop? Does it need a cable connection?
Cheers, Andrew
Congratulations on the guide created by you, if I had discovered it earlier I would have removed many doubts and perplexities. Thank you so much for this wonderful contribution.